Grabbing candy bowl with an Arduino, an IR sensor and an MG995 servo
Reach into the candy bowl and a skeleton hand swings down beside your fingers. It taps twice over the candy, then folds slowly back up and waits. It stops about 1 cm above the candy, next to the reaching hand, never on it. Pull the plug and it is just a candy bowl again.
From the Short Reach for the Candy, the Skeleton Hand Snaps at You | Arduino (posted 24 October 2026). Opens on YouTube.
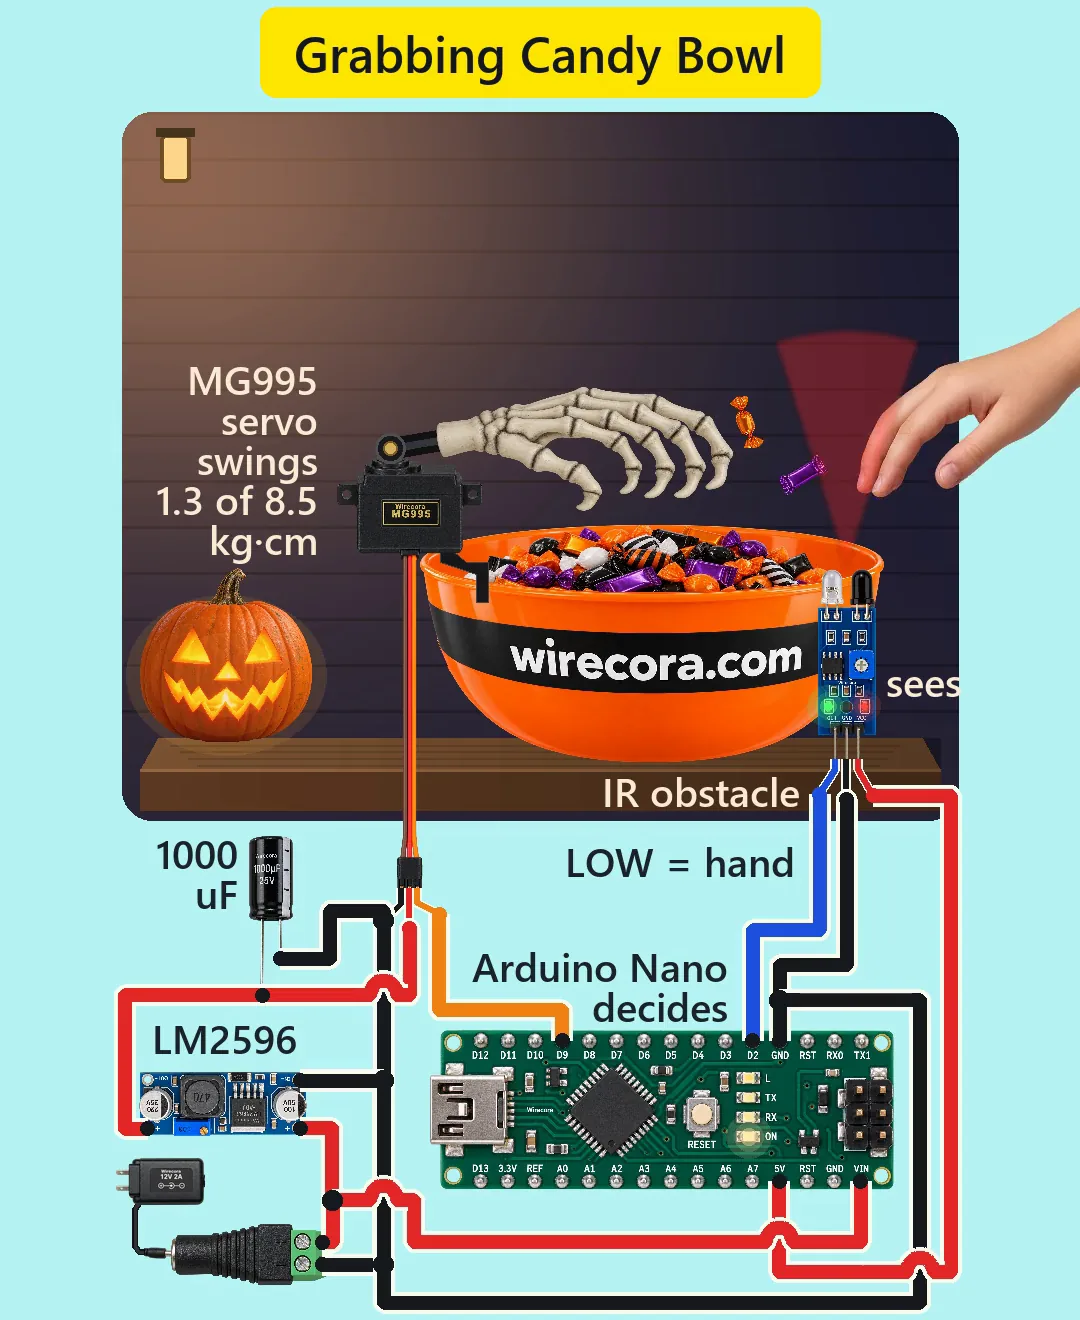
Parts
- Arduino Nano (an Uno works the same: same chip, same pins, same sketch)
- FC-51 IR obstacle sensor module, 3.3 to 5 V, pins OUT, GND, VCC from left to right seen from the component side with the two LEDs pointing up (follow the print on your board); OUT goes LOW while something is within its range (2 to 30 cm, set with its trimmer; about 15 cm here), about 35 degree view
- MG995 metal-gear servo (brown GND, red VCC in the middle, orange signal; 4.8 to 7.2 V; 8.5 kg·cm and 0.2 s per 60 degrees at 4.8 V; about 1.5 A when stalled). An SG90 (1.8 kg·cm, plastic gears) would strip the first time a kid grabs the hand.
- LM2596 buck converter module (input 3.5 to 40 V, 1.5 A continuous, 2 A for short peaks; IN and OUT grounds are joined on the board), its trimmer set to 5.0 V
- 1000 uF 25 V electrolytic capacitor (the stripe is the minus side)
- DC barrel jack to screw terminal adapter (5.5 x 2.1 mm, centre pin +) and a regulated 12 V 2 A adapter, centre positive
- A plastic candy bowl about 30 cm across, a light skeleton prop hand (about 90 g with its arm bar), a bracket that holds the servo at the bowl's rim, and a clip for the sensor
How it is wired
- First set the converter. Connect only the 12 V supply to the LM2596 IN+ and IN-, put a meter on OUT+ and OUT-, and turn the trimmer until it reads 5.0 V. A new module can come set to any voltage. Plug in the servo only after this.
- Adapter into the DC jack. Jack + (the centre pin) to the Nano's VIN pin (made for 7 to 12 V) and to the LM2596 IN+. Never put 12 V on the Nano's 5V pin.
- Jack minus to a Nano GND pin and to the LM2596 IN-. One common ground for everything.
- LM2596 OUT+ to the servo's red wire. Servo brown to the converter's ground (IN- is the same copper as OUT-). The servo's current then never flows through the Nano.
- 1000 uF across the servo supply, right at the servo plug: plus (long) leg on the red wire, stripe leg on the brown.
- Servo orange (signal) to Nano D9.
- Nano 5V (here an output, from the Nano's own regulator) to the FC-51 VCC, Nano GND to the FC-51 GND, FC-51 OUT to Nano D2.
- Clip the sensor to the front of the bowl with its two LEDs just above the rim, looking straight up over the half of the bowl where hands reach in. Turn its trimmer until its obstacle LED lights for a hand about 15 cm above it and stays dark with nothing there.
- Fix the servo on its bracket at the opposite rim with the hand clamped to its horn. Upload the sketch, then change GRAB until the hand stops just above the candy, and REST until it stands upright.
How it works
- The FC-51 shines infrared up from one LED and watches for the bounce with the other. A hand within the set range pulls OUT LOW. Because the sensor looks straight up, the candy, the bowl and the skeleton hand are never in its view; only a reaching hand is.
- D2 is read with INPUT_PULLUP, so a loose sensor wire reads HIGH (clear) and never fires the hand.
- When D2 goes LOW the Nano writes GRAB (35) to the servo. The Servo library sends a new pulse every 20 ms, so the servo starts within 20 ms and swings 110 degrees at up to about 300 degrees a second: down in about 0.4 s.
- The sketch waits 0.95 s after the GRAB write (the swing plus about half a second down), taps twice (up 12 degrees and back, 150 ms each), waits 0.1 s and then folds back to REST one degree every 15 ms: about 1.7 s.
- The sketch does not read the sensor while the hand moves, so a hand still in the bowl cannot start a second grab. Afterwards it waits until the beam has been clear for about 1 s before it arms again. While armed, anything over the sensor trips it, a falling leaf too.
- The pulses are 905 us at 35 degrees, 1029 us at 47 and 2039 us at 145, all inside the MG995's 500 to 2500 us.
- Holding the hand out flat takes 0.09 kg x 14 cm = 1.3 kg·cm of the MG995's 8.5 at 4.8 V. Because the hand stops above the candy, the servo never pushes against anything.
- Power, worst case: a stalled MG995 (only if someone holds the hand) takes about 1.5 A at 5 V, the most the LM2596 gives continuously. From the 12 V side that is 5 V x 1.5 A / (12 V x 0.85) = 0.74 A, plus 62 mA for the Nano and the sensor: about 0.8 A of the adapter's 2 A. The Nano's regulator drops (12 - 5) V x 62 mA = 0.43 W: warm, fine.
- The servo has its own 5 V rail and the 1000 uF beside it, which covers its start-up current, so the Nano does not reset when it moves. No flyback diode is needed: the servo has its own driver and nothing switches a bare coil. There is no reverse-polarity diode, so use only a centre-positive adapter (check the symbol on its label).
- Why not a PIR motion sensor? It would fire as kids walk up the steps. The IR module fires only when a hand is over the bowl, so the scare lands at the reach.
The code: grabbing_candy_bowl.ino
The Arduino code for this circuit is in the Wirecora Discord, in the channel #arduino-code (owner’s choice, 14 October 2026: the code lives where you can ask about it). It is a plain .ino file you can download there.
The sketch the Short was animated from, run step by step in a simulation on the hand drawn in the video; it has not been run on a real board yet. It uses the built-in Servo library. Change GRAB until the skeleton hand stops about 1 cm above the candy, and REST until it stands upright.
What the video simplifies
- The red beam is drawn to show where the sensor looks. Infrared is invisible.
- The sensor's range is set to about 15 cm with its trimmer. These modules work at dusk and indoors; direct sun can blind them.
- The electronics are drawn larger than the bowl, and the servo about twice its real size, so the pins and labels can be read.
- The servo is drawn side-on so its label and wires show. In a build its shaft faces you, with the hand on the horn.
- The skeleton hand is drawn about 18 cm long, leaning back at rest and lying across the bowl at GRAB. Real servos differ by a few degrees, so tune GRAB and REST on yours.
- The hand's 90 g weight, the moving current and the 1.5 A stall current are typical values, not measured.
- The 5.0 V setting of the LM2596 and the 0.8 A total are not printed in the video for lack of room; they are on this page.
- The child's reaction and the hopping candies are staged, and all the sounds are synthesised.
- This circuit was checked by simulation and against the datasheets, not built.
The electronics run on 12 V and 5 V from a regulated, certified 12 V adapter. Never put 12 V on the Nano's 5V pin, and set the LM2596 to 5.0 V before you plug in the servo. The hand must stop above the candy and land beside the reach, never where a hand is: tune GRAB with the power on and nobody near. An MG995 is strong enough to pinch: keep fingers out of the servo, the horn and the bracket, use a light hollow prop hand with no sharp points, and keep the bowl at a height where it cannot swing toward a face. Do not hold the hand while it moves; a stalled servo draws about 1.5 A and gets hot. Put the electronics in a box, out of reach of little hands and away from rain. For very young trick-or-treaters, unplug it.
Build it yourself
The wiring board cannot run an Arduino program yet, so this one cannot be opened on it. Start with the guided first build on the wiring board, where a circuit really works as you wire it, then try the ready-made ones.
Your first circuit, step by stepAll circuits from the Shorts
Stuck, or built it?
Ask about this circuit or show your build in the Wirecora Discord. Questions get an answer every day.