Self-filling dog water bowl with a 555, a float and two reed switches
The dog drinks the bowl down. When the water drops to the LOW mark, a small pump in a water jug switches on and pours water into the bowl through a clear tube. When the water reaches the HIGH mark, the pump stops by itself and FULL shows. It does not start again until the bowl has dropped to LOW once more, so it never flickers on and off while the dog laps. No code and no microcontroller: one 555 chip does the remembering.
From the Short Your Dog's Water Bowl Refills Itself (posted 26 October 2026). Opens on YouTube.
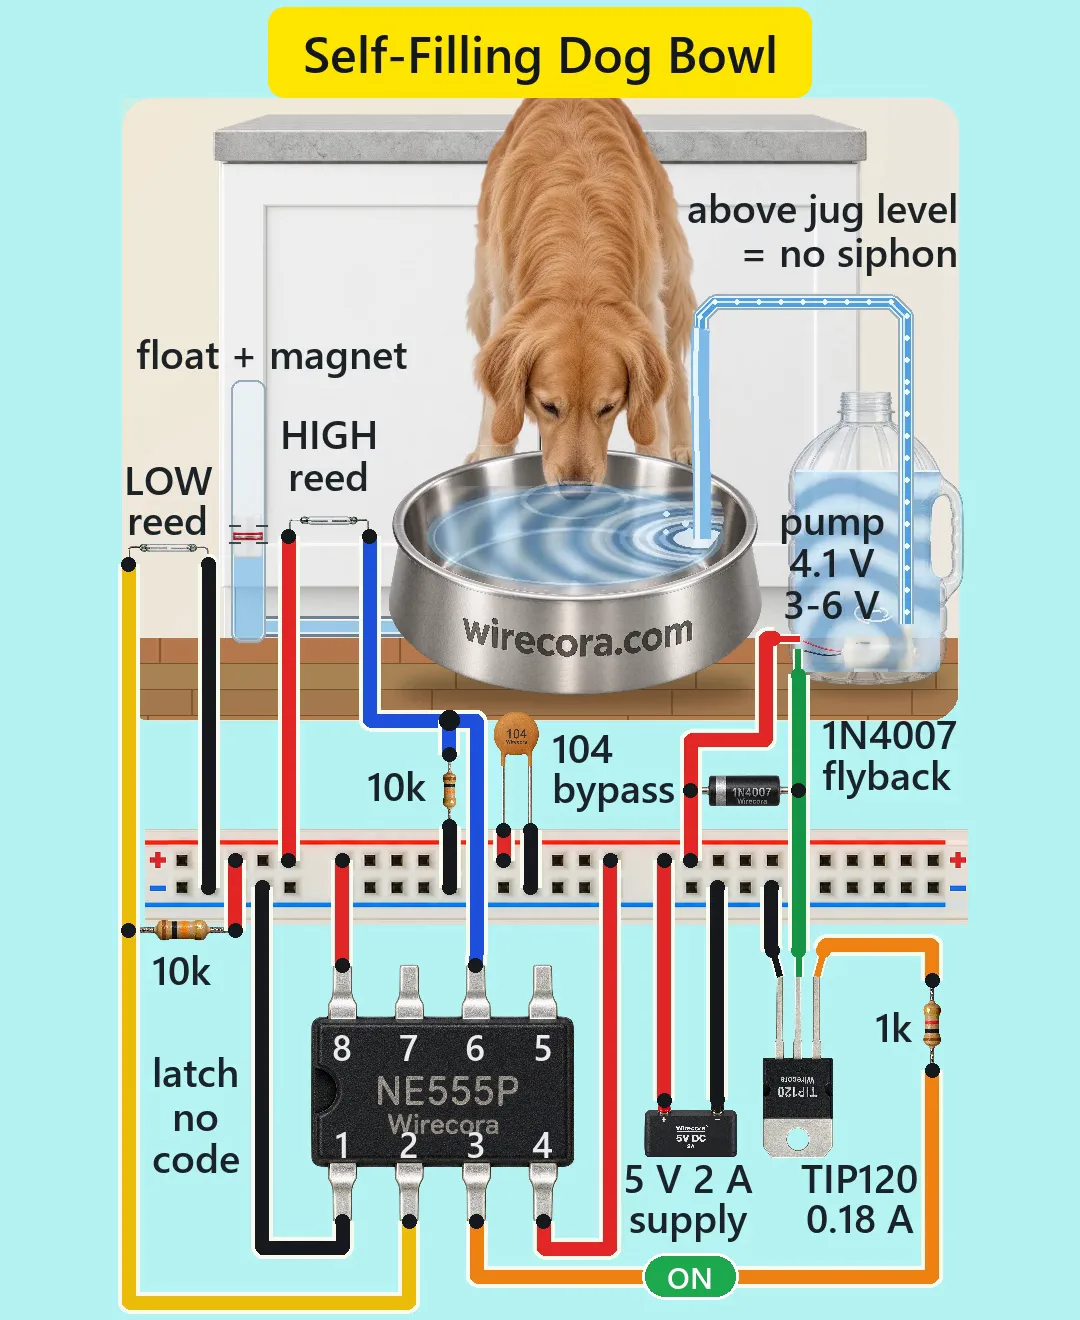
Parts
- NE555P timer, DIP-8 (notch to the left: pins 1 to 4 along the bottom from the left, 5 to 8 along the top from the right)
- TIP120 Darlington transistor, TO-220 (printed face toward you, legs down: B, C, E from the left; the metal tab is the collector)
- Two reed switches, normally open (glass body, not polarised; rated 0.5 A)
- A small sealed plastic float, about 16 mm across, with a bar magnet (about 12 x 4 mm, N35) glued or sealed inside, riding in a clear tube
- A clear tube about 2 cm (0.8 in) wide inside, standing upright beside the bowl and joined to the bowl near its bottom, so the water in it stands at the same level as in the bowl
- Two 10 k resistors (brown, black, orange) and one 1 k resistor (brown, black, red)
- 100 nF ceramic capacitor (printed 104) across the 5 V rail beside the chip
- 1N4007 diode across the pump (the flyback diode)
- 5 V submersible mini pump, 3 to 6 V, about 130 to 220 mA (red wire +, black wire -), with a food-safe tube to the bowl
- A water jug (about 3 L) for the pump, a steel dog bowl, and a breadboard (its power rail is enough)
- 5 V 2 A power supply
- Optional, not drawn in the Short: a second 100 nF capacitor right across the pump's two terminals to keep its brush noise off the 5 V rail
How it is wired
- Supply plus to the breadboard's + rail; supply minus to the - rail. The 100 nF (104) goes across the two rails next to the 555.
- 555 pin 8 (VCC) and pin 4 (RESET) to +5 V. Pin 1 (GND) to the - rail. Pin 5 (CONT) and pin 7 (DISCH) are left unconnected.
- 555 pin 2 (TRIG): a 10 k resistor up to +5 V, and the LOW reed switch from pin 2 down to the - rail.
- 555 pin 6 (THRES): a 10 k resistor down to the - rail, and the HIGH reed switch from pin 6 up to +5 V.
- 555 pin 3 (OUT) through the 1 k resistor to the TIP120 base (left leg). TIP120 emitter (right leg) to the - rail.
- TIP120 collector (middle leg) to the pump's black wire. Pump red wire to +5 V.
- 1N4007 across the pump: its band (cathode) on the pump's red wire (+5 V), its plain end on the pump's black wire (the TIP120 collector).
- Tape both reed switches flat against the outside of the clear tube, the HIGH one about 3 cm (1.2 in) above the LOW one, centre to centre. That gives a level swing of about 2 cm (0.8 in). Slide them up or down to set your own levels.
- Run the pump's outlet tube to the bowl with its highest point above the jug's highest water line, so the jug cannot siphon onto the floor when the pump stops.
How it works
- The float rides in the clear tube at the bowl's water level, with its magnet at the water line. A reed switch closes when the magnet is within about 6 mm of its middle.
- While neither reed is closed, the 10 k pull-up holds pin 2 near 5 V and the 10 k pull-down holds pin 6 near 0 V. In that state the 555 just keeps whatever its output was: it is used as a latch, not a timer.
- The level falls to LOW: the LOW reed closes and pulls pin 2 to 0 V, under a third of the supply (1.67 V). The latch sets, pin 3 goes high, about 2 mA flows into the TIP120 base through the 1 k and the TIP120 turns fully on. The pump gets about 4.1 V and draws about 0.18 A.
- As the bowl fills, the float leaves the LOW reed and it opens again, but the 555 remembers ON and the pump keeps running.
- The level reaches HIGH: the HIGH reed closes and puts 5 V on pin 6, over two thirds of the supply (3.33 V), while pin 2 is high. The latch resets, pin 3 goes low and the pump stops. It stays off until the level is back down at LOW.
- The two switch zones are about 2 cm apart, so both reeds are never closed at once, and the small ripples from the dog's lapping cannot switch the pump back and forth.
- Numbers: the TIP120 carries 0.18 A of its 5 A and loses about 0.16 W; the whole build takes about 0.19 A of the supply's 2 A; each reed carries only 0.5 mA when closed. Standing by, the 555 uses about 3 mA.
- When the pump switches off, its motor coil kicks back; the 1N4007 catches that kick so it cannot hurt the TIP120.
- At power-up the 555 may start either way. Both are safe: if it starts ON, it simply fills the bowl to HIGH and stops.
- One refill is about 380 mL (13 fl oz) and takes about 17 s, so a 3 L jug gives about six refills. Check it daily or add a float switch in the jug, so the pump never runs dry.
What the video simplifies
- Time is sped up: the bowl fills about 6 times faster than the real pump would (a real refill takes about 17 s), and the water climbs the tube a little faster than real.
- The dog drinks the bowl down far faster than a real dog, and lifts its head when the pump starts.
- The level change is drawn much larger than the 2 cm a real build uses: the bowl looks nearly empty, then nearly full.
- The jug is drawn narrower than a real 3 L jug and its water stays at one level; one refill lowers a real jug about 2 cm. The tube leaves the jug through a sealed hole above the water, and the pump wires through sealed holes low in the jug; in a real build, run the tube and the wires over the jug's rim.
- The reed switches are drawn larger and a little away from the tube. In a real build they lie flat against it.
- The electronics are drawn much larger than the scene and in front of it, and the power supply smaller than a real adapter.
- The pump's flow, its current and the reach of the float's magnet are typical values, not measured ones.
- The sounds are synthesised.
- This circuit was checked by simulation (ngspice) and against the datasheets, not built.
Everything runs on 5 V DC from a certified adapter; no mains wiring. No sensor or metal probe touches the dog's water: the reed switches sit outside the tube and the float is sealed plastic. The only part in the water is the sealed submersible pump in the jug, the same kind pet water fountains use; use a food-safe tube. Keep the supply, the breadboard and all joints dry, above the floor and out of the dog's reach, and tape the cables down so neither the dog nor you can chew or trip on them. Never let the pump run dry.
Build it yourself
The wiring board has no 555, reed switches or pump yet, so this one cannot be opened on it. Start with the guided first build on the wiring board, where a circuit really works as you wire it, then try the ready-made ones.
Your first circuit, step by stepAll circuits from the Shorts
Stuck, or built it?
Ask about this circuit or show your build in the Wirecora Discord. Questions get an answer every day.