Egg incubator that turns the eggs, with an Arduino Nano, a DHT22, a TIP120 heater switch and an MG995 servo
A box that hatches chicken eggs. An Arduino Nano keeps the air at 37.5 °C (99.5 °F) by switching a 12 V bulb on and off, a fan mixes the warm air, and a servo tilts the tray of twelve eggs 45 degrees one way, then two hours later the other way. From day 18 the tray stays level and still, as hatching guides ask, and around day 21 the chicks break out. A small screen shows °C, °F, humidity and the day.
From the Short Arduino Box Keeps 12 Eggs at 99.5 °F Until They Hatch (posted 23 October 2026). Opens on YouTube.
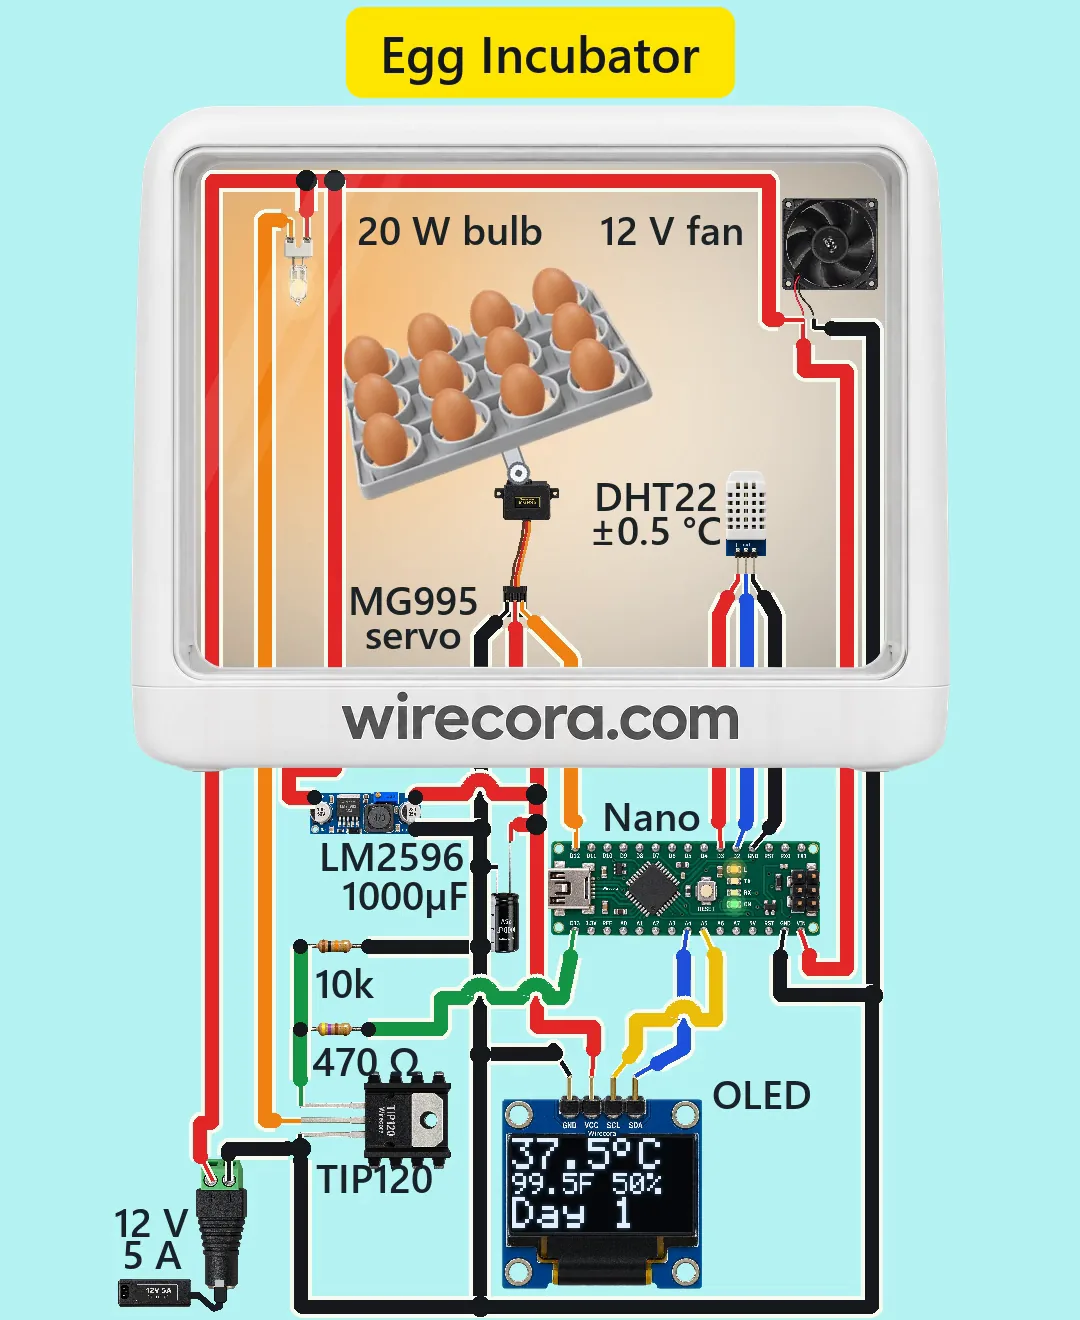
Parts
- Arduino Nano, 5 V (VIN takes 7 to 12 V; 20 mA recommended per pin)
- DHT22 (AM2302) temperature and humidity module, three pins + out - with the pull-up on the board; 3.3 to 6 V, about 1.5 mA, accurate to ±0.5 °C and ±2 % RH, one new reading every 2 s. Not a DHT11: it is only accurate to ±2 °C
- 0.96 inch I2C OLED, SSD1306, 128 x 64, address 0x3C, header GND VCC SCL SDA, 3.3 to 5 V, 20 mA max
- MG995 servo (4.8 to 7.2 V; 8.5 kg·cm at 4.8 V; stall about 1.5 A; plug brown = GND, red = +, orange = signal)
- TIP120 Darlington transistor, TO-220 (B, C, E from the left with the printed face toward you; the metal tab is the collector), on a clip-on heatsink of about 20 °C/W, with an insulating pad
- 470 ohm resistor and 10k resistor, 1/4 W
- LM2596 buck converter module, trimmer set to 5.0 V (1.5 A continuous, 2 A for a short time)
- 1000 uF 25 V electrolytic capacitor at the servo plug
- 80 mm 12 V fan, 75 mA max (red +, black -)
- 12 V 20 W G4 halogen capsule in a ceramic holder (the heater), with a small metal shield
- DC barrel jack with screw terminals, and a 12 V 5 A centre-positive adapter (5.5 x 2.1 mm plug, the 60 W desktop class)
- Strongly advised for a real build, not drawn in the Short: a 40 °C thermal cutoff or a normally closed 40 °C bimetal thermostat (KSD301 type, 2 A or more) at egg height, in series with the bulb
- The box: a foam-walled box with a window, a tray of twelve egg cups on its own axle with the servo driving it, and a water tray for humidity
How it is wired
- Adapter into the barrel jack. Jack + (12 V) to the Nano's VIN, the LM2596 IN+, the fan's red wire and one terminal of the bulb holder. Never put 12 V on the Nano's 5V pin; leave 5V and 3V3 unused.
- The bulb's other terminal to the TIP120 collector (the middle leg, or the tab, which is the same). TIP120 emitter (right leg) to ground.
- Nano D13 through the 470 ohm to the TIP120 base (left leg). The 10k from the base to ground keeps the heat off while the Nano starts or is unplugged.
- Set the LM2596 to 5.0 V with a meter BEFORE you connect the servo and the display: out of the box its trimmer can sit near the full 12 V, which kills both.
- LM2596 OUT+ (5.0 V) to the servo's red wire, the 1000 uF's long leg and the OLED's VCC. The capacitor sits right at the servo plug, stripe on ground.
- Servo orange (signal) to D12. Servo brown to ground.
- DHT22: + to D3 (the sketch sets D3 HIGH to power the sensor; it takes 1.5 mA), out to D2, - to a Nano GND pin.
- OLED: GND to ground, VCC to the 5.0 V from the LM2596, SDA to A4, SCL to A5. The Nano's 3V3 pin is not used: on many Nanos it only works with USB plugged in.
- One ground for everything: jack -, the Nano's GND, LM2596 OUT- (joined to IN- inside the module), the servo's brown wire, the capacitor's stripe, the fan's black wire, the TIP120 emitter, the 10k, the DHT22 - and the OLED GND.
- Inside the box: the bulb high up beside the fan, at least 10 cm from the eggs and from any foam or plastic, behind its metal shield; the DHT22 at egg height, where the temperature counts.
How it works
- Every 2 seconds the Nano reads the DHT22. Below 37.4 °C it switches the heat on, above 37.6 °C it switches it off, and between the two it leaves it as it is. That gap (hysteresis, as a W1209 thermostat uses) stops it clicking on and off at one number, so the reading swings about 37.3 to 37.7 °C (99.1 to 99.9 °F) around 37.5.
- Heat on: D13 goes HIGH and about 7 mA flows through the 470 ohm into the TIP120 base. The bulb's 1.5 A needs a gain of only about 210 and the TIP120 gives at least 1000, so it switches fully on. The bulb then gets about 11 V and makes about 17 W. D13 also lights the Nano's L LED, so you can see when it heats.
- Soft start: each time the heat comes on, the sketch ramps D13 from 0 to full in 50 steps of 4 ms (about 0.2 s), so the filament's power rises over 0.2 s instead of all at once. The ramp lowers the average, not the peak of each early pulse: the cold filament (about 0.7 ohm) still draws a spike that only the TIP120's gain limits, for well under a millisecond, and a simulation put it near 10 A, above the TIP120's 8 A peak rating. A logic-level MOSFET (an IRLZ44N in the same place, same 470 ohm and 10k) takes that spike easily and runs cooler.
- The TIP120 drops about 1 V while it carries 1.5 A, so it turns about 1.5 W into heat (about 3 W at the worst-case datasheet drop). In free air that would cook it; on a 20 °C/W heatsink its junction stays under about 95 °C in a 25 °C room.
- The fan runs all the time straight from 12 V, so the warm air reaches every egg and the sensor reads the mixed air. Nothing switched has a coil (the bulb is a plain resistance, the servo has its own driver), so no flyback diode is needed.
- Turning: every 2 hours the servo swings the tray from 45 degrees on one side to 45 degrees on the other (90 degrees), one degree every 20 ms, so a turn takes about 1.8 s; the very first move from level, and the return to level on day 18, are 45 degrees and about 0.9 s. That is a sixth of the MG995's top speed, gentle on the eggs. write(45) is a 1008 microsecond pulse, write(90) level is 1472, write(135) is 1936, all inside the servo's range.
- Load: a 150 g tray with twelve 60 g eggs, balanced about 4 cm above the axle, needs about 2.5 kg·cm at 45 degrees, against the MG995's 8.5.
- Day 18 (lockdown): the sketch counts days from power-up. From day 18 it moves the tray back to level once and never turns it again, so the chicks can line up to hatch. Keep the lid shut from then on.
- Humidity is shown, not controlled: keep about 50 % with the water tray up to day 18 and about 65 % from day 18 by adding water.
- Power: the bulb takes about 1.5 A, the fan 75 mA and the Nano about 20 mA; the servo takes about 0.4 A from the 5 V buck while it moves. Even with the servo stalled (1.5 A at 5 V, about 0.74 A from the 12 V side) the whole build stays near 2.4 A of the adapter's 5 A. The 1000 uF holds the 5 V up when the servo starts.
- In a foam box in a 20 °C room the bulb is on about half the time, and it can hold 37.5 °C down to a room of about 4 °C (the box's heat loss is assumed).
- Safety in the code: if the DHT22 gives no reading, the heat goes off (the screen shows ERR), and the 10k keeps it off while the Nano starts.
The code: egg_incubator.ino
The Arduino code for this circuit is in the Wirecora Discord, in the channel #arduino-code (owner’s choice, 14 October 2026: the code lives where you can ask about it). It is a plain .ino file you can download there.
The sketch the Short was animated from; every reading, heater switch and tray move on screen follows it. It has not been run on a real board yet. Install the DHT sensor library, Adafruit SSD1306 and Adafruit GFX with the Library Manager; Servo and Wire come with the Arduino IDE. Restart the Nano when you load a new batch: it counts days from power-up.
What the video simplifies
- Three weeks run as a time-lapse: only two tray moves and a few heater switchings are shown, the day counter races and the warm-up takes about a second. Each update of the screen stands for one 2 s reading.
- The clip jumps from the hatch back to Day 1 of the next batch. In real life you open the lid to load new eggs and restart the Nano, because the sketch counts days from power-up and never turns again after day 18 until a restart. A power cut also restarts the day count; an RTC clock module would keep it.
- The round magnifier over the hatching egg is a camera close-up, not something in the box.
- One chick hatches and is fluffy at once; a real chick dries for hours. Two other eggs only show small cracks.
- The tray is drawn tilting flat in the picture while the box is seen from slightly above, and the servo is drawn standing under it with the tray on its horn. In a build the tray turns on its own axle and the servo drives it. Which way write(45) tilts depends on how the servo is mounted.
- The servo moves at its real sketch speed while the readings are time-lapsed. The fan is drawn turning much slower than its 2600 rpm.
- The rise from 50 to 65 % humidity on day 18 comes from water you add; the circuit only reads it.
- The electronics are drawn about six times larger than the incubator; the bulb, the DHT22 and the adapter are drawn small. The heatsink's insulating pad and the thermal cutoff advised here are not drawn.
- Twelve turns a day (every 2 hours) is an even number; keepers often prefer an odd number so the eggs do not spend every night on the same side. Each side still gets 12 hours a day; set TURN_EVERY to 8 hours for three turns.
- After a reset the Nano's bootloader blinks D13 for a moment, so the bulb flashes briefly. That is harmless.
- The bulb's resistance (7.2 ohm hot, about 0.7 ohm cold), the box's heat loss, the tray and egg weights and the servo's moving current are assumed. The sounds are synthesised.
- The sketch in the video description is shortened and uses LT, GT and GE because YouTube does not allow those signs; the full sketch with the display code is below.
- This circuit was checked by simulation and against the datasheets, not built.
Everything runs on a 12 V DC adapter; no mains wiring. A halogen capsule gets hot enough to burn and to melt foam: keep it 10 cm or more from the eggs and from any plastic or foam, behind a small metal shield. If the incubator runs unattended, add a 40 °C thermal cutoff or a normally closed 40 °C bimetal thermostat (2 A or more) at egg height, in series with the bulb, because a failed transistor usually stays on. The TIP120's tab and heatsink are connected to the collector: insulate the heatsink so it cannot touch other metal. Set the buck to 5.0 V with a meter before you connect anything to it, and never put 12 V on the Nano's 5V pin. Wash your hands after handling eggs and chicks, which can carry Salmonella.
Build it yourself
The wiring board cannot run an Arduino program yet, so this one cannot be opened on it. Start with the guided first build on the wiring board, where a circuit really works as you wire it, then try the ready-made ones.
Your first circuit, step by stepAll circuits from the Shorts
Stuck, or built it?
Ask about this circuit or show your build in the Wirecora Discord. Questions get an answer every day.