Flying yard ghost with a motion sensor, an Arduino Nano and a 12 V gear motor
A trick-or-treater walks up the path, a motion sensor sees them, and a white cloth ghost launches from beside the porch, swoops across the yard right over their head, flies one lap of a fishing-line loop and parks itself back in its hiding spot, ready for the next visitor. One lap per visitor, and it always stops in the same place.
From the Short Walk Up the Path and a Ghost Flies Right Over Your Head (posted 24 October 2026). Opens on YouTube.
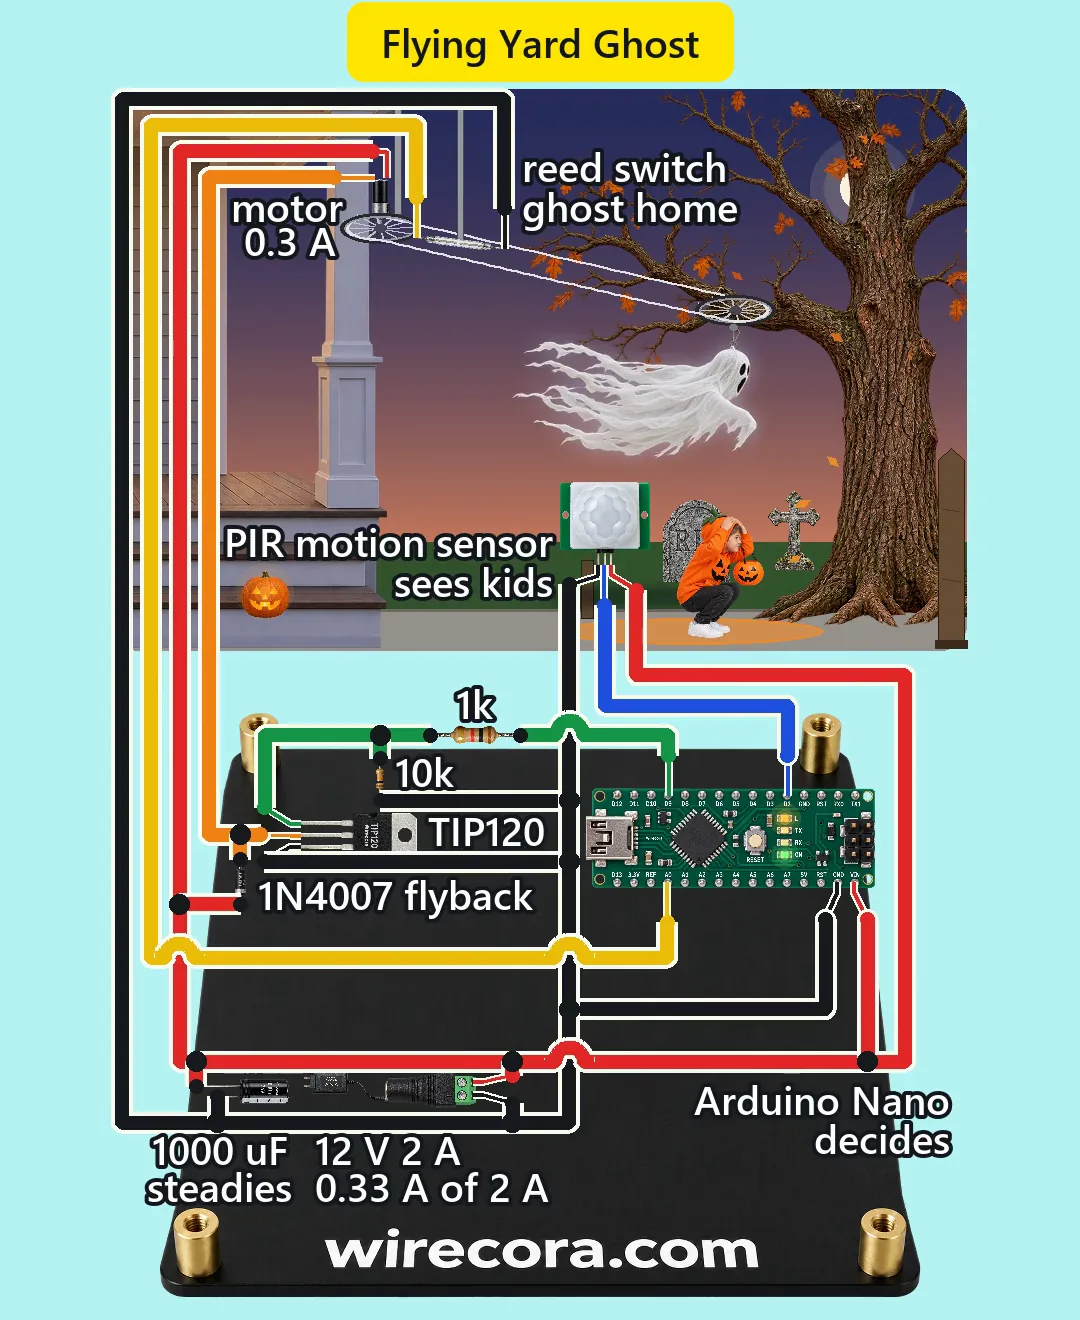
Parts
- Arduino Nano (an Uno works the same: same chip, same pins, same sketch)
- HC-SR501 PIR motion sensor (4.5 to 20 V supply, under 2 mA; OUT gives 3.3 V while it sees motion; pins GND, OUT, VCC from the left with the dome facing you)
- TIP120 Darlington transistor, TO-220 (B, C, E from the left with the printed face toward you; the metal tab is the collector; 60 V, 5 A)
- 1N4007 diode across the motor (flyback; 1000 V, 1 A)
- Resistors, 1/4 W: 1k (Nano D9 to the TIP120 base) and 10k (base to GND, keeps the motor off while the Nano boots)
- 1000 uF 25 V electrolytic capacitor across the 12 V supply
- 12 V brushed DC gear motor, 37 mm type (JGB37-520 class, about 107 rpm with no load; seller sheet: 60 mA no load, about 0.15 to 0.3 A running, stall about 1.2 A)
- Reed switch, normally open, two leads, not polarised (0.5 A switching), and a 10 mm neodymium disc magnet glued to the ghost's clip
- DC barrel jack (5.5 x 2.1 mm, centre pin +) and a regulated 12 V 2 A adapter, centre positive
- The prop: two 20-inch bicycle wheels lying flat (axle upright) as pulleys, light rims with no tyre, a shaft coupler from the motor to one hub, a hanger for the other wheel, fishing line in a closed loop round both rims, a swivel clip, and a light cloth ghost (cheesecloth over a foam head, about 300 g)
How it is wired
- Adapter into the barrel jack. Jack + (centre pin) is the +12 V rail, jack minus is GND. One supply, one ground for everything.
- +12 V to the Nano VIN pin (allowed 7 to 12 V), the PIR's VCC pin, the motor's red lead, the 1N4007's band (cathode) end and the 1000 uF's long (+) leg. Never put 12 V on the Nano's 5V pin; it stays free.
- GND to a Nano GND pin, the PIR's GND pin, the TIP120 emitter, the lower end of the 10k, the 1000 uF's stripe (-) leg and one lead of the reed switch.
- Motor black lead to the TIP120 collector and to the 1N4007's plain (anode) end. The diode sits across the motor, band toward +12 V. Nothing else may touch the TIP120's metal tab: it is the collector.
- Nano D9 through the 1k to the TIP120 base. The 10k from the base to GND.
- PIR OUT to Nano D2. Its 3.3 V counts as HIGH: the ATmega328P needs at least 3.0 V at 5 V.
- The reed switch's other lead to Nano A0. The sketch turns on A0's internal pull-up, so no resistor is needed: reed closed = LOW = ghost home. Twist the two reed wires together and keep them a few centimetres from the motor pair.
- Put the 1000 uF right beside the TIP120 and the diode, across +12 V and GND.
- HC-SR501 settings: jumper on L (single trigger), time trimmer fully anticlockwise (the shortest hold, about 1 to 3 s depending on the board), sensitivity in the middle. Point it down at the path, so it sees people walking up and not the ghost passing above.
- Mechanics: the motor stands on top of the porch wheel with its shaft down in the hub. The second wheel hangs from a tree branch across the yard. The reed switch sits on its own small bracket about 1 cm above the line at the home spot, right over where the magnet on the clip stops. Run the motor and reed wires along the porch ceiling and down the wall, never through the ghost's path.
How it works
- At rest the ghost hangs at home: the magnet holds the reed closed, so A0 reads LOW. D9 is LOW, the 10k holds the TIP120 base at 0 V, and the motor is off. While the Nano boots its pins float for a second or two; the 10k keeps the motor from twitching then.
- A visitor walks into the PIR's view. About 0.1 s later its OUT goes to 3.3 V, D2 reads HIGH, and the Nano's own L LED (D13) lights to show it. The sketch starts one lap.
- Soft start: the sketch raises the PWM on D9 from 0 to 255 over 0.3 s, so the line and the gearbox take up the load gently instead of with a jerk. Then D9 stays fully HIGH and the line runs at about 2 m/s: that is the swoop over the visitor's head.
- Slow approach: 1.95 s after the start the sketch drops the duty to 40 of 255 (16 %). The ghost creeps the last stretch round the porch wheel at about 0.9 m/s.
- Park switch: the sketch first waits until the reed has read open 3 times in a row (30 ms), so it knows the ghost has left home. Then the first closed reading stops the motor. The ghost coasts 2 to 3 cm and stops in its spot, the same trick as a car wiper's park switch. One lap of the 5.8 m loop in the Short takes about 4.4 s.
- One lap per visitor: the sketch flies again only after the PIR has gone LOW and HIGH again. In L mode the HC-SR501 holds OUT HIGH for its set time (about 1 to 3 s at the trimmer's minimum), then ignores motion for about 2 to 2.5 s, so the next visitor gets the next lap. Someone who stays in view triggers it again after that, and gets another lap once the ghost is home.
- Snag guard: if the ghost has not come home within 10 s (a jammed line), the sketch stops the motor and blinks the L LED until you reset the Nano. That also limits how long the TIP120 carries a stall current.
- The transistor: D9 at about 4.9 V pushes about 3.5 mA into the base (the pin may give 20 mA). The motor needs only 86 times that, and the TIP120 gives at least 1000 times, so it is fully on: about 0.8 V across it, about 11.2 V at the motor, about 0.25 W of heat at full speed and 0.06 W in the creep, against 2 W in free air.
- Protection: while the PWM switches, the 1N4007 carries the motor current in every off part of the cycle and catches the voltage kick at switch-off (the collector peaks about 12.9 V in simulation, far under the TIP120's 60 V). The 1000 uF supplies the current pulses so the long lead to the adapter and the Nano's VIN stay steady.
- Currents: motor about 0.3 A, Nano about 20 mA, base 3.5 mA, PIR under 2 mA: about 0.33 A of the adapter's 2 A. The Nano's regulator drops 12 V to 5 V and gets warm, about 0.2 W, which is fine.
- Why not a car wiper motor and a switch, like the viral builds: a wiper motor pulls 2 to 4 A running and far more at stall, too much for a 2 A adapter; a 0.3 A gear motor is plenty for a light cloth ghost. A heavy ghost does need the wiper motor, a relay and a 10 A supply. And without the reed switch the ghost stops wherever it is when the sensor times out.
The code: flying_yard_ghost.ino
The Arduino code for this circuit is in the Wirecora Discord, in the channel #arduino-code (owner’s choice, 14 October 2026: the code lives where you can ask about it). It is a plain .ino file you can download there.
The sketch the Short was animated from: the same timing and states ran in the video's simulation. It needs no libraries. It has not been run on a real board. For a loop of another length, set FAST_MS so the ghost is about 2 m before home when it ends; if the ghost stops before home during the creep, raise CREEP.
What the video simplifies
- The electronics are drawn far larger than the yard so the pins and labels can be read: the motor about 4 times its real size, and the wall adapter smaller than real.
- The orange zone on the path only shows where the PIR looks. A real PIR's field is invisible.
- The PIR is drawn facing the camera on a garden stake so its pins show; a real one points down at the path.
- The four motor and reed leads are drawn as four separate coloured lanes along the porch ceiling and down the house wall; in a build, twist the reed pair together and keep it a few centimetres from the motor pair.
- The reed switch is drawn about 10 cm above the magnet; in a build it sits about 1 cm above it. In the picture the far run of the line touches its right end; in a real yard that run passes behind it.
- The 10k is drawn about half the size of the 1k. Both are ordinary 1/4 W resistors.
- Several numbers are left off the screen for lack of room (VIN 7 to 12 V, the 3.3 V PIR signal, the TIP120's 0.3 A of 5 A, the magnet). They are all on this page.
- The motor's loaded speed (95 rpm), its 0.3 A, its stall current and its inductance are taken from a seller sheet, not measured. The speed at part duty comes from a simulation with a smooth load; a real line has more friction, so you may need to raise CREEP if the ghost stops before home.
- The ghost hangs about 1 m under the line. Hang the line about 3 m up so the ghost passes over grown-ups' heads, not into them.
- The ghost's swing and cloth ripple come from a simple pendulum and air-drag model; its glow and shadow are stylised. The kid turns round in one step.
- The Short runs in real time, not sped up. All the sounds are synthesised; the faint PWM whine of a real motor is left out.
- This circuit was checked by calculation, an ngspice simulation and the datasheets, not built.
Everything runs on 12 V and 5 V DC from a regulated, certified 12 V adapter; no mains wiring. Outdoors, plug the adapter into an outdoor-rated, GFCI-protected outlet and keep the adapter and the electronics dry, in a box or under the porch roof. Hang the line high (about 3 m) so the ghost passes over heads, use only a light cloth ghost on a foam head with no hard or sharp parts, and keep the line away from the street and walkways where it could catch someone. Keep fingers and hair away from the wheels while the motor runs and unplug before you work on it. Tape cables down so nobody trips on the path. Give the PIR 30 to 60 s to settle after power-up.
Build it yourself
The wiring board cannot run an Arduino program yet and has no gear motor, reed switch or PIR sensor, so this one cannot be opened on it. Start with the guided first build on the wiring board, where a circuit really works as you wire it, then try the ready-made ones.
Your first circuit, step by stepAll circuits from the Shorts
Stuck, or built it?
Ask about this circuit or show your build in the Wirecora Discord. Questions get an answer every day.