Automatic flood gate with an Arduino, two screws and a servo
When rainwater overflows the drain and reaches two screws on the garage sill, a buzzer beeps once and a servo swings a flat panel up across the doorway in 0.3 s. The water piles against the panel and the floor inside stays dry. When the screws have been dry for one second, the panel folds slowly back down.
From the Short Water Hits the Driveway, the Flood Gate Rises by Itself (posted 28 October 2026). Opens on YouTube.
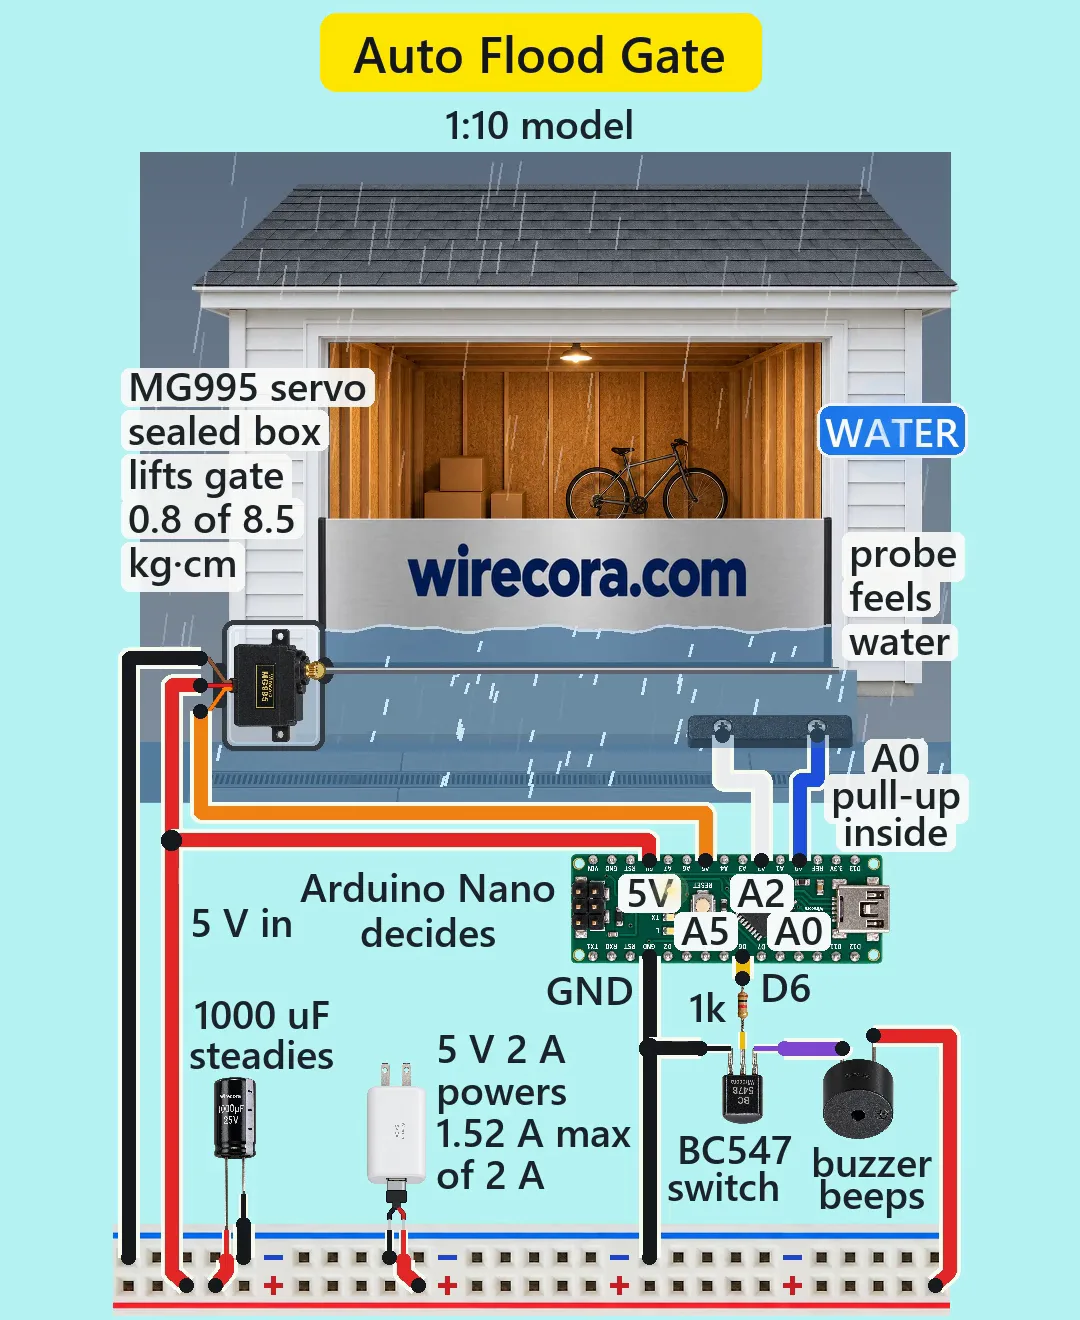
Parts
- Arduino Nano (an Uno works the same)
- MG995 metal-gear servo (brown GND, red VCC, orange signal; 4.8 to 7.2 V; 8.5 kg cm at 4.8 V; about 1.2 to 1.8 A when stalled)
- 1000 uF 25 V electrolytic capacitor (the stripe is the minus side)
- Active 5 V buzzer (the longer pin is plus; about 30 mA)
- BC547 NPN transistor and a 1k resistor
- 5 V 2 A USB power adapter with a cut USB cable (red = +5 V, black = GND)
- Breadboard power rails, or any two bus strips
- Two stainless steel screws about 1.8 cm apart in a plastic or wooden strip: the water probes
- A 26 x 8 cm aluminium panel (about 2 mm thick, about 120 g) on a hinge along one long edge, with a rubber seal; a sealed box for the servo
How it is wired
- Adapter +5 V (red) to the + rail; adapter GND (black) to the - rail.
- Nano 5V pin to the + rail and a Nano GND pin to the - rail. Feed only regulated 5 V into the 5V pin; leave VIN empty (it needs 7 to 12 V).
- Servo red to +5 V, brown to GND, orange (signal) to Nano A5. The Servo library makes its pulses on any pin.
- Solder the 1000 uF capacitor right at the servo plug, plus (long leg) to red and minus (stripe) to brown. It covers the servo's current bursts so the Nano does not reset.
- One probe screw to Nano A2, the other to Nano A0. No resistor: the sketch uses A0's own pull-up inside the chip.
- Nano D6 through the 1k resistor to the BC547 base. BC547 emitter to GND, collector to the buzzer minus pin, buzzer plus to +5 V. Flat face toward you, legs down, the BC547 legs are C, B, E from left to right.
- Fix the servo shaft to the panel's hinge axle, with the hinge on the garage side, so the panel lies flat in front of the door and swings up against the door frame. Set the probe strip on the sill just in front of the flat panel.
How it works
- About ten times a second the Nano reads the screws. For half a millisecond it pulls A2 to 0 V and turns on A0's internal pull-up (20 to 50 kOhm to 5 V), reads A0, then lets both pins float again. Dry, A0 reads about 1023.
- Water between the screws pulls A0 down: about 408 of 1023 under driveway runoff and about 786 under clean rain (both estimates with a 35 kOhm pull-up). Anything below 900 counts as wet. A thin 1 mm film of rain reads about 930, so drizzle alone does not raise the gate: only standing water does.
- The first wet reading starts a 0.2 s beep, then gate.write(UP) turns the panel 90 degrees at the servo's full speed, about 0.3 s. The beep always ends before the servo moves, so the two never draw current together.
- The panel is 1 cm wider than the doorway and leans on the door frame, so the water pushes it onto the frame, not onto the servo. In the model 2.4 cm of water pushes with only about 0.06 kg cm.
- Every wet reading restarts a 1 second timer. Once the screws have been dry for more than 1 s, the panel folds down one degree every 6 ms: 91 steps, about 0.55 s, a soft close.
- Lifting the 120 g panel from flat at full speed takes about 0.8 kg cm of the MG995's 8.5.
- Pulses: write(170) is 2296 microseconds (flat), write(80) is 1368 (upright), both inside the servo's 500 to 2500 range. Tune FLAT and UP on your build.
- The BC547 gets 4.3 mA of base current (0.27 mA is enough for the buzzer's 30 mA), so it switches fully on. The buzzer has its own driver inside, so no flyback diode is needed.
- Worst case the adapter gives 1.5 A to a stalled servo plus about 19 mA for the Nano: 1.52 A of its 2 A.
- The screws carry at most 0.25 mA, and only 0.5 % of the time, so stainless screws corrode very slowly.
The code: flood_gate.ino
The Arduino code for this circuit is in the Wirecora Discord, in the channel #arduino-code (owner’s choice, 14 October 2026: the code lives where you can ask about it). It is a plain .ino file you can download there.
The sketch the Short was animated from, run step by step in a simulation on the water drawn in the video; it has not been run on a real board yet. One change for the page: Servo.h in angle brackets (the Short's text could not hold them). It needs only the Servo library, which comes with the Arduino IDE. Change FLAT and UP until the panel lies flat and just touches the door frame.
What the video simplifies
- This is a 1:10 model. A servo cannot hold back a real flood: 80 cm of water presses about 2,200 N m on a full-size 2.6 m hinge, the stall torque of some 2,600 MG995s. Real self-closing flood barriers are lifted by the floodwater itself.
- The electronics are drawn much larger than the garage, and the probe strip is drawn larger than its scale, so the pins and labels can be read.
- The rain, the runoff and the drain are drawn, and minutes of a real storm are shown in seconds. A wet sill strip takes longer to dry than shown, so a real panel waits longer before it folds down.
- The WATER tag and the beep arcs are drawn to show what the Nano reads; there is no such light in the circuit.
- The A0 readings depend on how salty the water is, and a 35 kOhm pull-up is assumed. The panel weight and the servo currents are typical values, not measured.
- The edge along the hinge is assumed sealed.
- The beep is softer than a real 2.3 kHz buzzer, and all the sounds are added.
- The capacitor is drawn on the power rails next to the servo wires. It is on the same two wires, but solder it at the servo plug.
- This circuit was checked by simulation and against the datasheets, not built.
Everything runs on 5 V. Plug the adapter into a socket well above any water, on a GFCI (RCD) protected circuit, and keep the Nano and the adapter dry. The MG995 is not waterproof: put it in a sealed IP67 box with a cable gland and a seal on the axle, or behind the wall. Set UP so the panel just touches the frame; if it presses on it, the servo stalls at about 1.5 A and gets hot. Keep fingers out of the hinge. This model needs power to work, so do not rely on it to protect a real garage.
Build it yourself
The wiring board cannot run an Arduino program yet, so this one cannot be opened on it. Start with the guided first build on the wiring board, where a circuit really works as you wire it, then try the ready-made ones.
Your first circuit, step by stepAll circuits from the Shorts
Stuck, or built it?
Ask about this circuit or show your build in the Wirecora Discord. Questions get an answer every day.