Arduino honey jar filler with an HX711 scale and an MG995 servo
Set an empty jar on the scale and the honey gate opens by itself. A load cell weighs the jar while the honey runs in. The gate shuts about 5 g before 500 g, because the reading lags a little and the gate needs 0.2 s to close, so the jar ends within a few grams of 500 g (about 1 lb). Take the full jar off, set down the next empty one, and it starts again. It stops by weight, not by time: thick cold honey runs slower, but the scale still shuts the gate at the same weight.
From the Short Arduino Scale Fills Every Honey Jar to 500 g by Itself (posted 20 October 2026). Opens on YouTube.
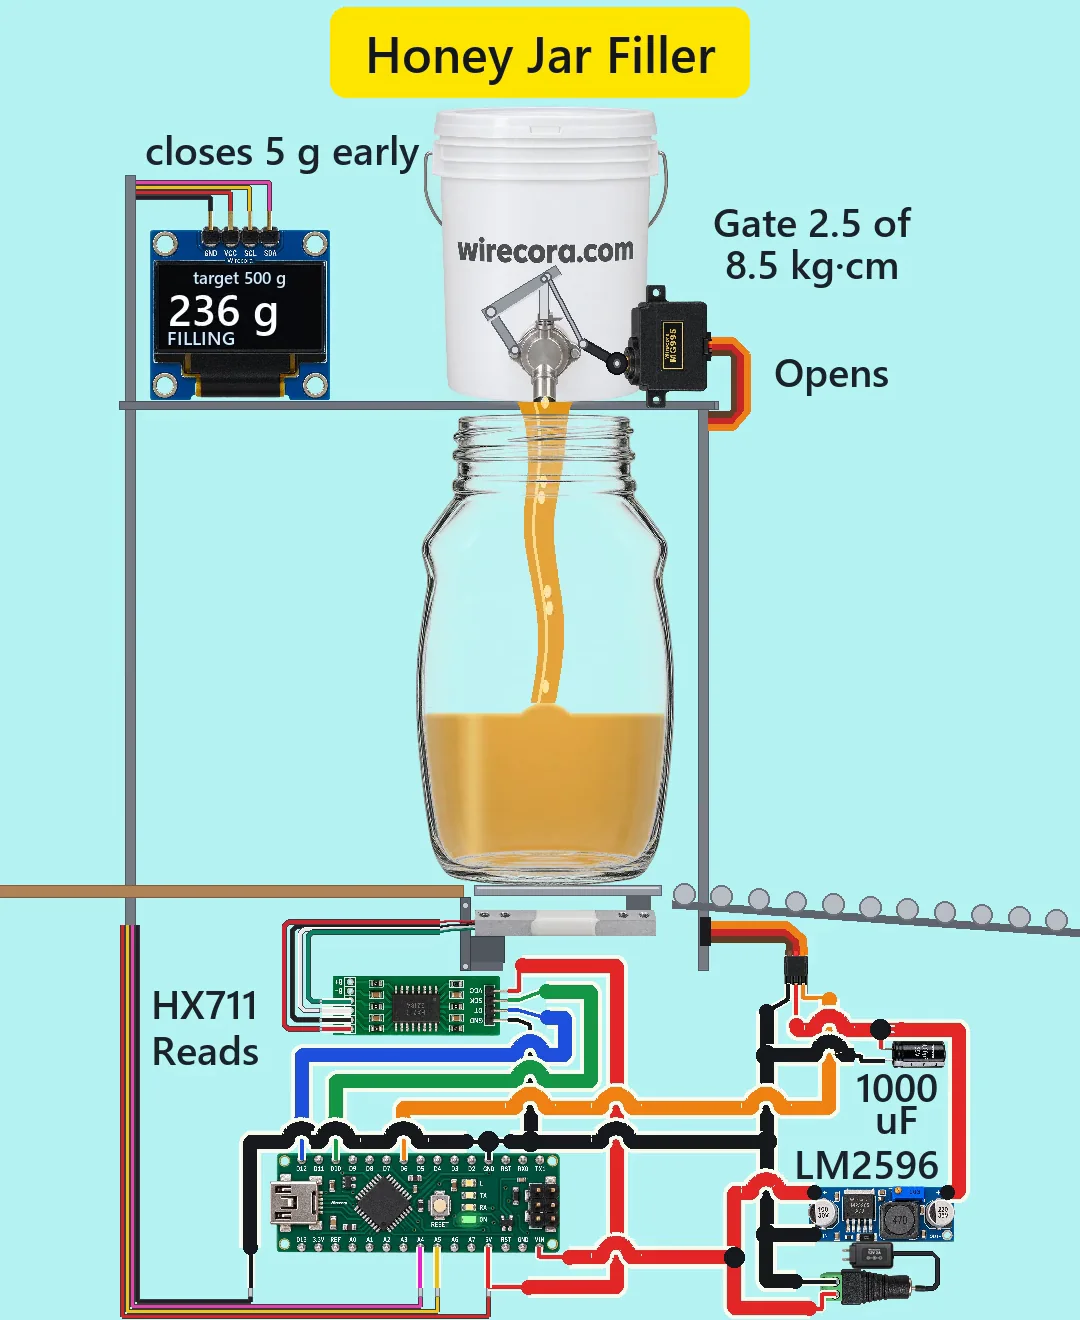
Parts
- Arduino Nano (an Uno works the same: same chip, same pins, same sketch)
- HX711 load cell amplifier, the green module: header GND, DT, SCK, VCC; pads E+, E-, A-, A+, B-, B+ (2.6 to 5.5 V; the chip takes under 1.5 mA and the load cell about 4 mA more; 10 readings a second because the module ties its RATE pin low; 24 bit)
- 5 kg straight bar load cell, about 80 x 13.5 x 13.5 mm, about 1.0 mV per volt and about 1000 ohm, four leads red, black, green and white, with a base block, a spacer and a small platform
- MG995 metal-gear servo (4.8 to 7.2 V; 8.5 kg·cm and 0.2 s per 60 degrees at 4.8 V; brown GND, red VCC in the middle, orange signal; the maker gives no current, sellers list 1.2 A or more when stalled)
- LM2596 buck converter module (input 3.5 to 40 V, 1.5 A continuous, 2 A for short peaks; IN and OUT grounds are joined on the board), its trimmer set to 5.0 V
- 1000 uF 25 V electrolytic capacitor (the stripe is the minus side)
- 0.96 inch SSD1306 I2C OLED, 128 x 64, pins GND, VCC, SCL, SDA from left to right (some boards swap GND and VCC: follow the print), address 0x3C (a few use 0x3D)
- DC barrel jack to screw terminal adapter (5.5 x 2.1 mm, centre pin +) and a regulated 12 V 2 A adapter, centre positive
- A food-grade honey bucket with a stainless honey gate that has a lever, a steel plate to hold the servo, a servo horn with a hole 20 mm from the shaft, and a bent steel wire pushrod with a Z-bend at each end
- Glass jars for 500 g of honey (the sketch assumes 230 g empty; set JAR_MIN and JAR_MAX for your jars)
How it is wired
- First set the converter. Connect only the 12 V supply to the LM2596 IN+ and IN-, put a meter on OUT+ and OUT-, and turn the trimmer until it reads 5.0 V. A new module can come set to any voltage. Plug in the servo only after this.
- Adapter into the DC jack. Jack + (the centre pin) to the Nano's VIN pin and to the LM2596 IN+. Never put 12 V on the Nano's 5V pin.
- Jack minus to a Nano GND pin and to the LM2596 IN-. One common ground for everything.
- LM2596 OUT+ to the servo's red wire. Servo brown to the converter's ground: the Short uses IN-, which is the same copper as OUT-. The servo's current then never flows through the Nano.
- 1000 uF across the servo supply: plus (long) leg on OUT+ and the servo red, stripe leg on ground. Put it right at the servo plug if you can.
- Servo orange (signal) to Nano D6.
- Nano 5V (here an output, from the Nano's own regulator) to the HX711 VCC and the OLED VCC. Nano GND to the HX711 GND and the OLED GND.
- HX711 DT to Nano D12, HX711 SCK to Nano D10.
- OLED SDA to Nano A4, OLED SCL to Nano A5.
- Load cell to the HX711: red to E+, black to E-, green to A+, white to A-. B- and B+ stay free. Some cells use other colours, so check your cell's sheet. If the weight reads negative, swap green and white.
- Bolt the cell's fixed end (where the leads leave) to the frame through a block, and the platform to the other end through a spacer, so the bar is free to bend. If the bar has an arrow on it, the arrow points down, the way the load pushes. The platform must touch nothing else: leave a few mm of gap to the infeed table and the chute.
- Fix the servo on its plate beside the gate and join the horn hole (20 mm from the shaft) to a hole near the end of the gate lever with the pushrod. Adjust SHUT and OPEN in the sketch so the gate is shut at SHUT and open at OPEN, each just short of the gate's own end stop.
How it works
- The load cell is a metal bar with four strain gauges in a bridge. The HX711 feeds it about 4.3 V on E+ (about 4 mA) and amplifies the tiny difference on A+ and A-. 500 g gives only about 0.43 mV, far inside the HX711's range (about +-17 mV at 4.3 V). Jar and honey together, about 730 g, are well under the cell's 5 kg.
- The HX711 gives the Nano 10 readings a second. At power-up the sketch waits 0.5 s for the HX711 to settle and then zeroes the empty platform (tare), so switch on with nothing on it. CAL turns the counts into grams: find it once with a known weight.
- When the scale is READY and three readings in a row each agree with the one before within 2 g and lie between 225 and 245 g (an empty jar), the Nano stores that as the jar's weight and turns the servo to 75 degrees: the gate opens. A full jar or a half-full one never starts a fill.
- While the honey runs, the reading counts the honey in the jar, and the falling stream presses on the jar about as hard as the honey in the air weighs. When the net weight reaches 500 minus the early offset (5.5 g to start with), the servo goes back to 15 degrees and the gate shuts.
- Why early: each reading averages the last 0.1 s, and the weight can pass the mark just after a reading, so the sketch sees it up to 0.1 s late. The slide then takes about 0.2 s to close. At 38 g/s that is about 5.5 g that still arrives. After 400 ms, once the reading is steady again (three readings within 2 g), the sketch shows DONE and corrects the offset by half the error, so the next jar comes closer. In simulation the first jar ended between 499 and 507 g for honey flowing 20 to 60 g/s, and with the learned offset the next jars at 38 g/s ended between 499.7 and 503.5 g.
- At DONE the sketch detaches the servo, so no servo pulses run while the jar waits (the slide holds by friction). That matters because the HX711 library turns interrupts off while it reads, which can stretch a servo pulse now and then and make a held servo twitch. The OLED keeps the final weight. When the reading falls under 150 g (the full jar is off), it shows 0 g and READY. If a jar is lifted off during a fill, the gate shuts at once.
- The servo stops at 15 and 75 degrees, just short of the gate's stops, so it never pushes against them and stalls. It turns 60 degrees in about 0.2 s. Moving the gate needs about 2.5 kg·cm (a slide friction of 1.5 kgf is assumed, on the 20 mm horn) of the MG995's 8.5 at 4.8 V.
- Power: this build assumes a stalled MG995 takes about 1.5 A, the most the LM2596 gives continuously (it allows 2 A for short peaks). From the 12 V side that is 5 V x 1.5 A / (12 V x 0.85) = 0.74 A, plus about 45 mA for the Nano, OLED and HX711: 0.78 A of the adapter's 2 A in the worst case. Even at 2.5 A, the highest figure sellers give, the adapter would carry about 1.3 A. The Nano's regulator drops (12 - 5) V x 45 mA = 0.31 W, which is fine.
- The servo has its own 5 V rail and the 1000 uF beside it, which covers its start-up pulses, so the Nano does not reset when it moves. No flyback diode is needed: the servo has its own driver and nothing switches a bare coil. There is no reverse-polarity diode, so use only a centre-positive adapter (check the symbol on its label).
The code: honey_jar_filler.ino
The Arduino code for this circuit is in the Wirecora Discord, in the channel #arduino-code (owner’s choice, 14 October 2026: the code lives where you can ask about it). It is a plain .ino file you can download there.
The sketch the Short was animated from, with its show() written out for this page and a 0.5 s wait added before the tare (the HX711 needs 400 ms to settle after power-up). The same fill logic, written in Python, ran in the video's simulation on the weights in the video; this sketch has not been compiled or run on a real board. It needs the HX711 Arduino Library (by Bogdan Necula), Servo, and Adafruit SSD1306 with Adafruit GFX. Find CAL once with a known weight, as the HX711 library's README explains. Set JAR_MIN to about 5 g under your empty jar and JAR_MAX to about 15 g over it. TARGET is the fill weight in grams.
What the video simplifies
- The fill is shown 16 times faster than real. 500 g takes about 13 s at the assumed 38 g/s. The gate, the servo, the hand and the jars move at real speed.
- Because the fill is sped up, the OLED number changes nearly every frame. The real one changes 10 times a second.
- The machine is drawn at two scales: the jar is drawn wider than the bucket, and the 80 mm load cell is drawn about 53 mm long. The electronics are drawn larger than the machine.
- The 1000 uF sits at the converter end of the servo lead, not at the plug, for lack of room. In a build, put it at the plug. Electrically both work here.
- The servo lead runs inside the stand's right post (a tube) down to its plug. The full jar rolling out passes in front of it, at the post's depth.
- The HX711 board is drawn turned round, so the load cell leads cover its pad print. The order is still E+ red, E- black, A- white, A+ green.
- The jars are changed by hand and roll out on a gravity roller chute: there is no conveyor motor.
- Assumed: honey 1.42 g/ml, a flow of 38 g/s through the open gate (warm honey), empty jars of 230 g, and 1.5 kgf of gate friction. The 1.5 A stall current is a typical figure, not from the MG995 sheet.
- In the sketch, if a jar is lifted off during a fill, the gate shuts, but the honey already falling lands on the empty platform. That is not shown.
- The glass sheen and all the sounds are added.
- This circuit was checked by simulation and against the datasheets, not built.
The electronics run on 12 V and 5 V from a regulated, certified 12 V adapter. Never put 12 V on the Nano's 5V pin, and set the LM2596 to 5.0 V before you plug in the servo. Everything that touches honey must be food-safe: a food-grade bucket, a stainless honey gate made for honey, and clean glass jars. Wash and dry them before use. The servo, the pushrod and the wires stay dry, away from the honey's path, with the electronics in a box below or beside the machine where drips cannot reach them. Wipe up drips: honey on the load cell or under the platform changes the reading. The gate snaps shut with real force, so keep fingers away from the lever and the pushrod while it is powered. Catch the jars at the end of the chute so the glass does not fall. If you sell your honey, your country's food hygiene rules apply to the whole machine.
Build it yourself
The wiring board cannot run an Arduino program yet and has no load cell, so this one cannot be opened on it. Start with the guided first build on the wiring board, where a circuit really works as you wire it, then try the ready-made ones.
Your first circuit, step by stepAll circuits from the Shorts
Stuck, or built it?
Ask about this circuit or show your build in the Wirecora Discord. Questions get an answer every day.