Automatic rain cover for the washing with an Arduino and a rain sensor
Rain starts to fall on the sensor plate and, within half a second, a servo swings a cover down flat over the clothes on the line. The rain lands on the cover, not on the washing. When the plate has stayed dry for a while, the cover lifts back up.
From the Short Rain Starts, the Cover Closes Over the Clothes by Itself (Arduino) (253K views, posted 15 October 2026). Opens on YouTube.
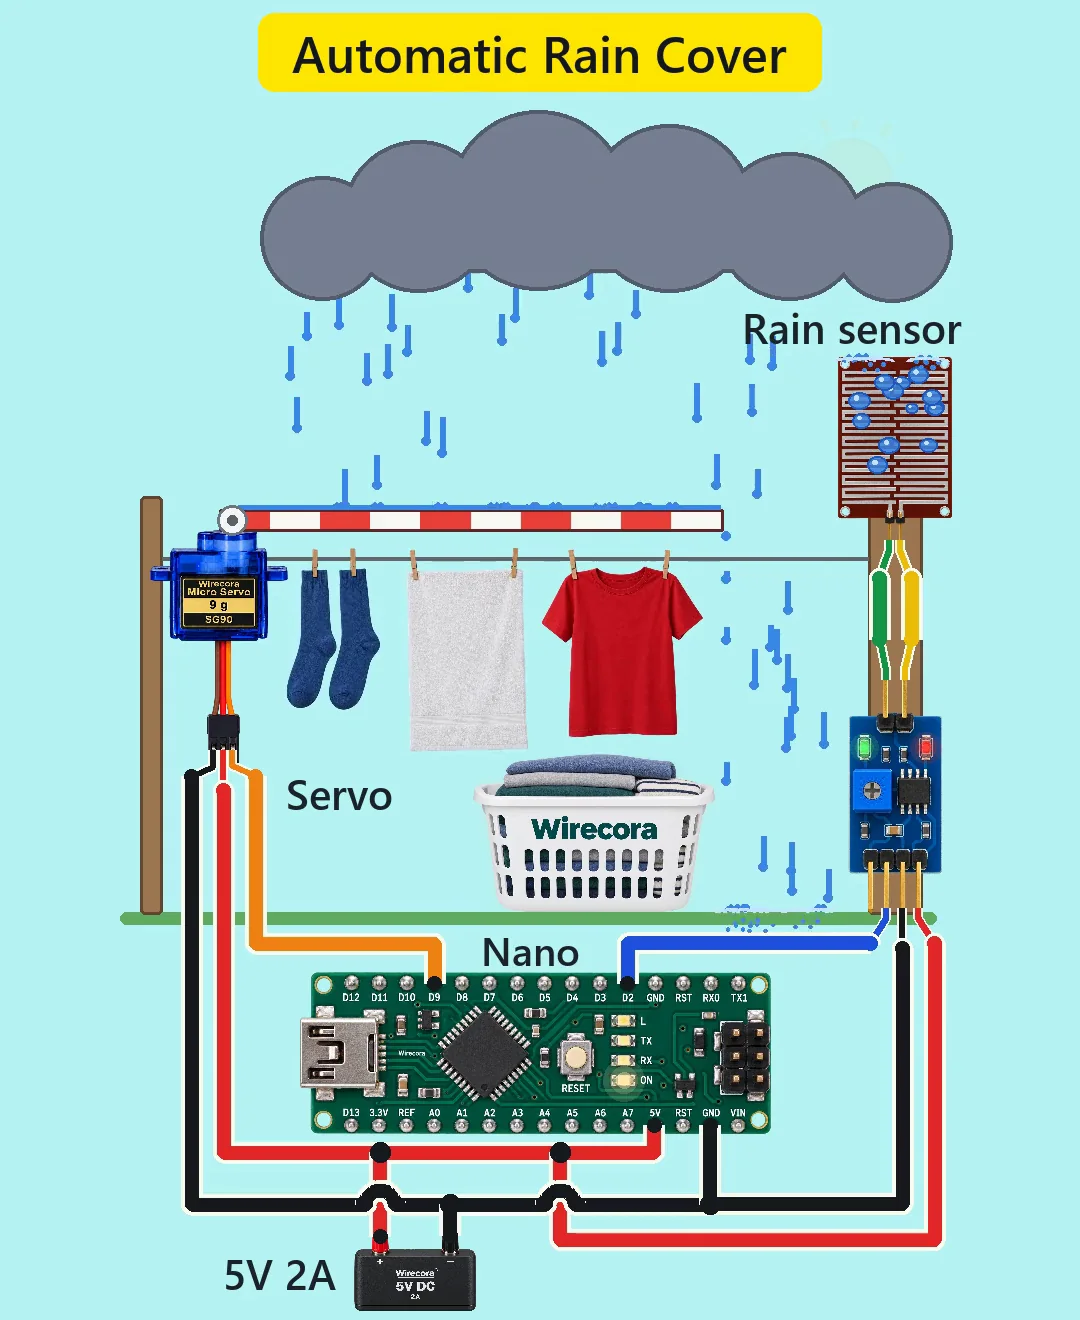
Parts
- Arduino Nano (an Uno works the same)
- Rain sensor kit: the rain plate (two bare metal combs, FC-37 type) and its small LM393 control board with a trimmer (YL-38 type, 3.3 to 5 V, about 8 mA, a power LED and an LED that lights while the plate is wet). Board pins: AO, DO, GND, VCC from left to right with the four pins towards you and the parts up. Boards differ, so follow the print on yours.
- SG90 micro servo (brown GND, red VCC, orange signal; made for about 5 V, rated at 4.8 V; 1.8 kg cm; about 0.65 A when stalled, up to about 0.75 A on some units)
- Regulated 5 V 2 A supply
- Optional: a 470 uF 10 V or higher electrolytic capacitor (the stripe is the minus side). Not drawn in the video; good practice at the servo.
- A light cover on the servo horn: about 14 cm of foam board (about 5 g)
How it is wired
- Supply plus (5 V) to the Nano's 5V pin, the sensor board's VCC and the servo's red wire. Nano VIN stays free.
- Supply minus to a Nano GND pin, the sensor board's GND and the servo's brown wire. One common ground.
- Sensor board DO to Nano D2. AO is not used.
- Nano D9 to the servo's orange (signal) wire.
- The plate's two pins to the board's two-pin side, either way round (the plate has no polarity).
- Optional: put the 470 uF capacitor at the servo plug, across its red and brown wires: plus (long leg) on red, stripe on brown.
- Only the plate goes out in the rain, lying tilted and face up so water runs off. Keep the board, the Nano, the servo and the supply dry, in a box or under a roof.
- Fix the servo on top of the pole with its shaft level and at right angles to the line, and fix the cover to the horn so it stands upright at 90 degrees and lies flat along the line at 0.
How it works
- The plate's two combs are not joined. Water bridges them, and the plate becomes a resistor: dry it is over 1 megohm, wet (tap water) a few kilohm.
- On a typical board, a 10 k resistor feeds the plate from 5 V. Dry, the plate node sits at about 5 V; wet (5 k assumed), it drops to 1.67 V. The LM393 compares it with the voltage set on the trimmer, and below that it pulls DO LOW (about 0.2 V) and the wet LED lights. Dry, the board's pull-up holds DO at 5 V.
- Set the trimmer to about 3.0 V and DO goes LOW once the plate is under about 15 k. The LM393's inputs only work up to 3.0 V on 5 V (3.5 V at room temperature), so the trimmer cannot make it much more sensitive. For light drizzle, read AO on an analog pin instead.
- The Nano reads D2. LOW means wet: the target is 0 degrees, the cover flat over the clothes. HIGH means dry: the target is 90 degrees, the cover upright.
- Each pass of the loop moves the servo 3 degrees and waits 15 ms: 200 degrees a second, so the 90 degree swing takes about 0.45 s. With no load the SG90 can turn about 600 degrees a second.
- The sketch below waits until the plate has been dry for DRY_MS (30 s) before it lifts the cover. Without that wait, as in the video, the cover would flap up and down while a wet plate slowly dries and DO flickers.
- Supply load, worst case with the servo stalled: about 0.65 A for the servo (some units up to about 0.75 A) plus about 19 mA for the Nano and 8 mA for the sensor board. That is under 0.8 A of the supply's 2 A.
- The servo has its own driver inside, so no transistor or flyback diode is needed. The optional 470 uF helps keep the 5 V steady when the servo starts to move.
- Regulated 5 V goes straight into the 5V pin and skips the Nano's own regulator; VIN would need 7 to 12 V.
The code: rain_cover.ino
The Arduino code for this circuit is in the Wirecora Discord, in the channel #arduino-code (owner’s choice, 14 October 2026: the code lives where you can ask about it). It is a plain .ino file you can download there.
The sketch the Short was animated from, with one change: the cover waits until the plate has been dry for DRY_MS before it lifts. With DRY_MS at 0 it behaves exactly like the video's sketch, which was run pass by pass against the video's frames; it has not been run on a real board yet. It uses the built-in Servo library. Fit the horn with the servo at 90 and the cover upright, then check that 0 lays it flat over the line.
What the video simplifies
- It is a table-top model. An SG90 moves a 14 cm foam-board cover with ease (about 0.035 kg cm of its 1.8), but a full-size cover of about 1.4 m needs about 35 kg cm: use a geared motor with end stops.
- The cover reacts to the very first drop. A drop of clean rain conducts far less than tap water (our estimate: about 40 to 80 k), so a real board trips after a few drops or a wet film. Turn the trimmer until the wet LED lights with a few drops on the plate.
- The plate dries about a second after the last drop. A real plate stays wet for minutes, and the cover stays down that long.
- The video's sketch lifts the cover the moment the plate reads dry. The sketch on this page adds a 30 s wait; with DRY_MS set to 0 it behaves exactly like the video's sketch.
- The servo is drawn from the side with its shaft pointing up. In a build the shaft points at you in this view: level and at right angles to the line, with the cover on the horn.
- The plate is drawn face-on and catches the drops on its top edge. In a build it lies tilted, face up.
- The board and the servo stand in the rain in the picture. In a build only the plate gets wet.
- The cover lies flat. A real one should tilt a little so the water runs off.
- No capacitor is drawn at the servo. On a 2 A supply it works without one, but a 470 uF there is good practice.
- The sensor board's picture has no print. Its pins are drawn in the usual order, AO, DO, GND, VCC, but follow the print on your own board.
- The electronics are drawn many times larger than the scene. The cloud grows in place, the rain and the 2.5 s shower are stylised, and the sounds are synthesised.
- The viral original pulled the washing in under a roof; this one swings a cover over it.
- A plate fed with DC all the time corrodes within some months. For a build that lasts, power the sensor board from a Nano pin and switch it on only to take a reading.
- This circuit was checked by calculation and against the datasheets, not built.
Everything runs on 5 V from a regulated supply. Never put a battery or anything above 5.5 V on the 5V pin. To upload the sketch, unplug the 5 V supply and the servo plug first, so USB never has to power the servo, then plug them back in after the USB cable is out. Only the plate may get wet: keep the board, the Nano, the servo and the supply dry. A servo can pinch a finger, so keep hands away from the cover while it is powered.
Build it yourself
The wiring board cannot run an Arduino program yet, so this one cannot be opened on it. Start with the guided first build on the wiring board, where a circuit really works as you wire it, then try the ready-made ones.
Your first circuit, step by stepAll circuits from the Shorts
Stuck, or built it?
Ask about this circuit or show your build in the Wirecora Discord. Questions get an answer every day.