Automatic rain wiper with an Arduino, a rain sensor and a servo
The first drops land on a small rain plate on the glass and the wiper starts by itself. When the rain gets heavy it wipes faster with no pause. When the rain eases it slows down again, and once the plate is dry the blade goes back to rest along the bottom of the glass.
From the Short Arduino Wiper Starts by Itself and Wipes Faster in Heavy Rain (posted 22 October 2026). Opens on YouTube.
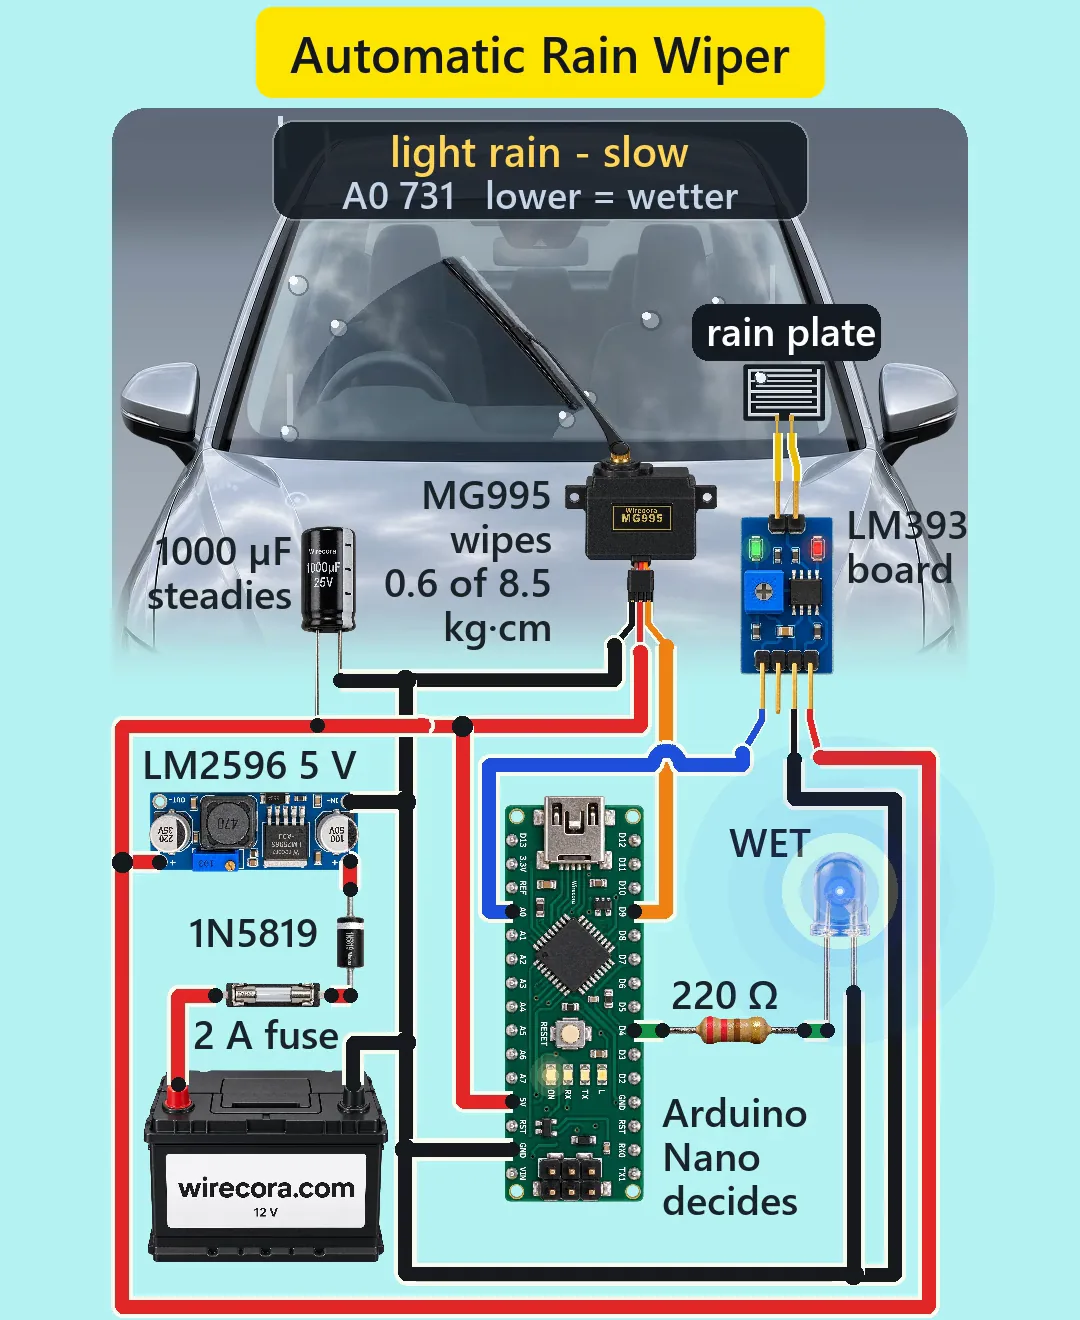
Parts
- Arduino Nano (an Uno works the same)
- Rain sensor kit: the rain plate (two bare metal combs, FC-37 type) and its small LM393 board (YL-38 type, 3.3 to 5 V, about 8 mA). Board pins: AO, DO, GND, VCC from left to right with the four pins towards you and the parts up. Boards differ, so follow the print on yours.
- MG995 metal-gear servo (brown GND, red VCC, orange signal; 4.8 to 7.2 V; 8.5 kg cm and 0.2 s per 60 degrees at 4.8 V; about 1.5 A when stalled)
- LM2596 buck converter module (input 3.5 to 40 V, 1.5 A continuous, 2 A for short bursts), its trimmer set to 5.0 V before anything else is connected
- 1000 uF 25 V electrolytic capacitor (the stripe is the minus side)
- 2 A quick-acting fuse in a holder. In a car, use a 2 A blade fuse in an inline holder.
- 1N5819 Schottky diode (40 V, 1 A; the band is the cathode) as a reverse guard
- Blue 5 mm LED with a 220 ohm resistor
- A 12 V supply: a 12 V battery on the bench, or in a car an ignition-switched fuse tap (add-a-fuse)
- A light model wiper arm and blade on the servo horn, sweeping a sheet of acrylic
How it is wired
- Battery plus to the fuse, the fuse's other side to the 1N5819's plain end (anode). The diode's banded end (cathode) to LM2596 IN+. The fuse sits first, right at the battery.
- Battery minus to LM2596 IN-. IN- and OUT- are the same copper on the module.
- LM2596 OUT+ (5.0 V) to the servo's red wire, the capacitor's plus (long) leg, the Nano's 5V pin and the rain board's VCC. Nano VIN stays empty: a running car gives about 14.4 V, more than VIN is meant for, and the regulated 5 V goes straight to 5V.
- One common ground: battery minus, LM2596 IN-, the servo's brown wire, the capacitor's stripe leg, a Nano GND pin, the rain board's GND and the LED's short leg (cathode).
- Rain board AO to Nano A0. The board's DO pin is not used (its LED still lights while the plate is wet).
- Nano D9 to the servo's orange (signal) wire.
- Nano D4 through the 220 ohm resistor to the blue LED's long leg (anode).
- The plate's two pins to the board's two-pin side, either way round (the plate has no polarity).
- Fit the 1000 uF capacitor right at the servo plug, across its red and brown wires. It covers the servo's current bursts so the Nano does not reset.
How it works
- The plate's two combs are not joined. Water bridges them, and the plate becomes a resistor: over 1 megohm dry, a few kilohm to a few tens of kilohm wet.
- On a typical board a 10 k resistor feeds the plate from 5 V, so AO sits near 5 V when dry and falls as the plate gets wetter. The Nano reads it as A0 = 1024 x R / (R + 10 k): about 1013 dry, 731 at 25 k (light rain), 292 at 4 k (heavy rain).
- Above 800 (the plate over about 36 k) counts as dry: the WET LED is off, the blade stays parked and the Nano checks again every 20 ms.
- From 400 to 800 is light rain: one slow wipe, 110 degrees up and back in 1-degree steps of 6 ms (1.33 s), then a 0.3 s pause.
- Below 400 (the plate under about 6.4 k) is heavy rain: a fast wipe with 4 ms steps (0.89 s) and no pause.
- A wipe blocks the sketch, so the plate is read only between wipes. A new speed always starts with the next wipe, never in the middle of one.
- Servo angles: write(20) is the blade flat at rest (a 750 microsecond pulse), write(130) is 110 degrees up (1884 microseconds), both inside the MG995's 500 to 2500. The fast wipe turns at 250 degrees a second, under the servo's 300.
- The model blade (40 g, wet rubber on acrylic) needs about 0.6 kg cm; the MG995 gives 8.5.
- Current: while wiping the 5 V side draws about 0.44 A. If the blade is held still the servo can pull about 1.5 A, 1.54 A in all, right at the LM2596 module's 1.5 A rating (the chip has its own current limit and shuts down when hot). From the 12 V side that is about 0.8 A, well under the 2 A fuse. The LED gets about 8 mA from D4 (the pin allows 20).
- Parked and dry, the whole circuit still draws about 25 mA, about 0.6 Ah a day. That is why a car build takes its 12 V from an ignition-switched fuse, not straight from the battery.
- No flyback diode is needed: nothing here switches a bare coil. The servo has its own driver, and the LM2596 module carries its own catch diode.
The code: rain_wiper.ino
The Arduino code for this circuit is in the Wirecora Discord, in the channel #arduino-code (owner’s choice, 14 October 2026: the code lives where you can ask about it). It is a plain .ino file you can download there.
The sketch the Short was animated from, run step by step in a simulation against the video's frames; it has not been run on a real board yet. It uses the built-in Servo library. It writes PARK before attach, so the servo does not twitch at power-up. Set PARK and TOP on your own servo, and set the 800 and 400 thresholds with your own plate.
What the video simplifies
- The circuit moves a light model blade on acrylic, not a full-size wiper. The car and its wiper are drawn full size so the sweep fills the screen. A real wiper needs the car's own 2 to 4 A wiper motor, switched by the Nano through a relay; the common 5 V relay module turns on when its input is LOW, so set that pin HIGH first thing in setup.
- Real cars use an optical sensor behind the glass near the mirror: infrared light bounces inside the windshield and every drop on the outside lets some of it escape. It reads the glass the blade has just cleared, so it stops as soon as the glass is clear. The plate is the simple model of the idea.
- The plate dries about a second after the rain stops. A real plate stays wet for minutes, and the wiper keeps going that long.
- The electronics and the battery are drawn several times larger than they would be next to the car, so the pins and labels can be read.
- The servo is drawn side-on at the wiper's pivot. In a build it sits under the cowl with its shaft up through it.
- The 1000 uF capacitor is drawn a little away from the servo plug. It is on the same two wires, but fit it right at the plug.
- The plate resistances, the 10 k resistor on the rain board, the blade's weight and drag and the servo's moving current are assumed. The 1.5 A stall current is a typical datasheet value. Set the 800 and 400 thresholds on your own plate.
- Servos differ in how far one write() degree turns. Set PARK and TOP on your own servo so the blade lies flat and stops short of the pillar.
- The sensor board's picture has no print. Its pins are drawn in the usual order, AO, DO, GND, VCC, but follow the print on your own board.
- A plate fed with DC all the time corrodes within months. For a build that lasts, power the sensor board from a Nano pin and switch it on only to take a reading.
- A permanent car install also adds a TVS diode across the 12 V input against voltage spikes.
- The viral original ran a motor straight from a BC547, a 100 mA transistor, with no flyback diode. This one uses a servo on its own regulated 5 V behind a fuse and a reverse-guard diode.
- The rain, the drops on the glass and the sounds are stylised or synthesised.
- This circuit was checked by calculation and against the datasheets, not built.
The electronics run on 5 V from the LM2596; set it to 5.0 V with a meter before connecting the Nano, and never put 12 V on the 5V pin. Keep the fuse right at the 12 V source; a car battery can deliver hundreds of amps into a short. Do not tap into the car's real wiper wiring or block the driver's view with a test build, and do not test it while driving. To upload the sketch, unplug the 12 V and the servo plug first, then plug them back in after the USB cable is out. Only the plate may get wet. A servo can pinch a finger, so keep hands off the blade while it is powered.
Build it yourself
The wiring board cannot run an Arduino program yet, so this one cannot be opened on it. Start with the guided first build on the wiring board, where a circuit really works as you wire it, then try the ready-made ones.
Your first circuit, step by stepAll circuits from the Shorts
Stuck, or built it?
Ask about this circuit or show your build in the Wirecora Discord. Questions get an answer every day.