Self-pouring cauldron with a motion sensor, a TIP120 and a small water pump
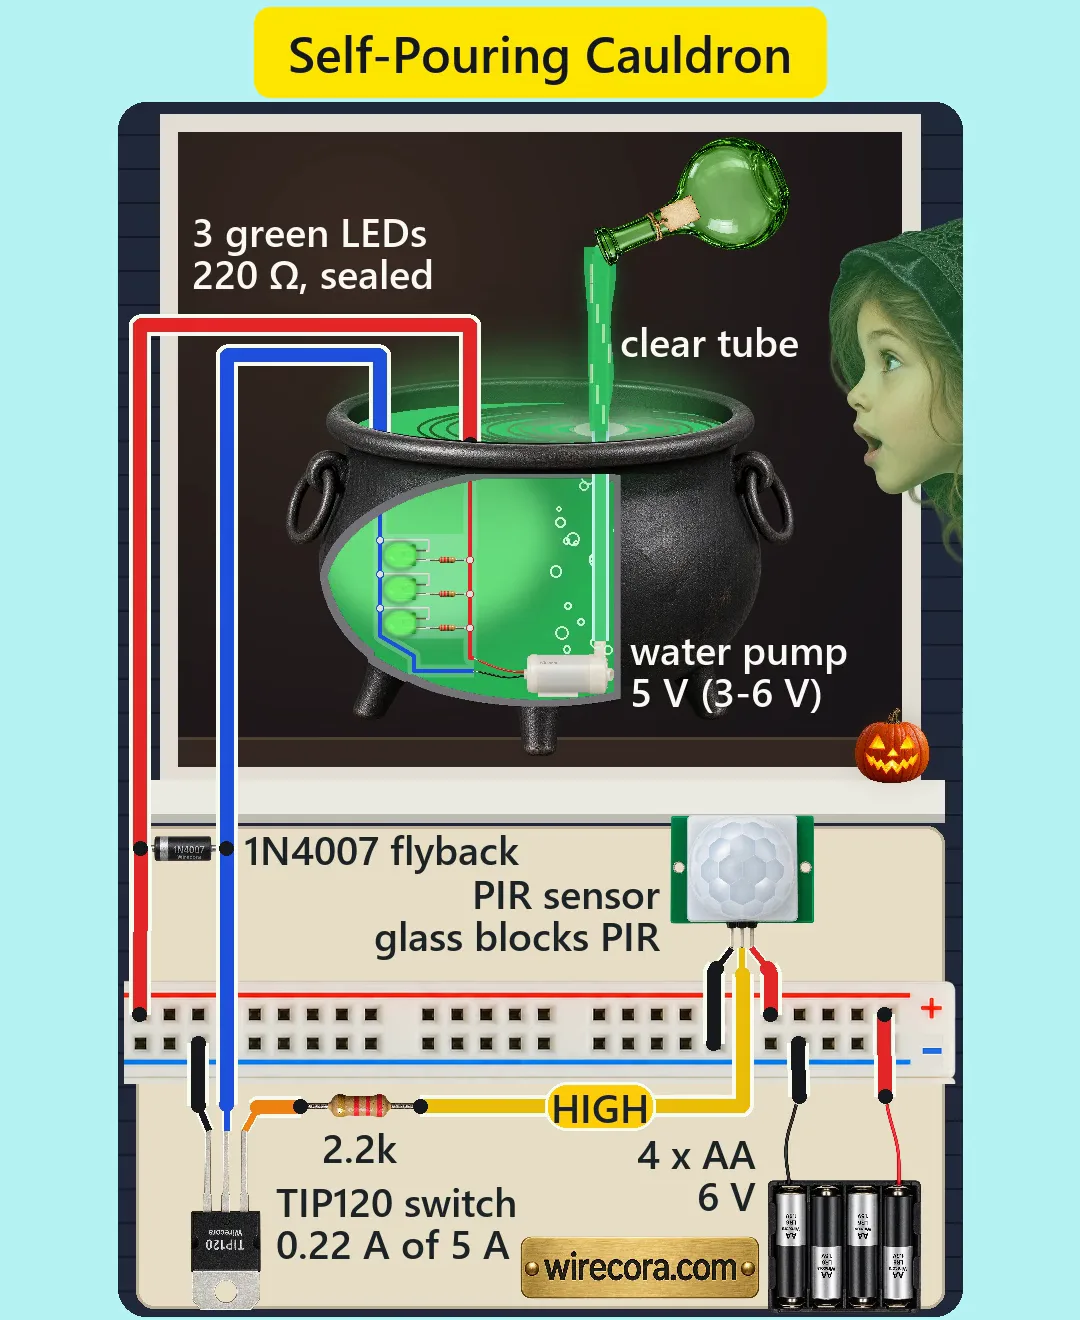
The Halloween window stays dark until a trick-or-treater leans in to look. A motion sensor outside the glass sees them, the water in the cauldron lights up green, and a potion bottle hanging in mid-air starts pouring an endless stream into it. About 3 seconds later it stops by itself and waits for the next face at the glass. The trick: a clear tube hidden inside the stream holds the bottle, and a small pump in the cauldron pushes the same water up it again and again. There is no Arduino and no code: the sensor's own timer and one transistor do it all, on four AA cells.
From the Short Walk Past the Window and the Cauldron Pours Itself (posted 27 October 2026). Opens on YouTube.
Parts
- HC-SR501 PIR motion sensor (4.5 to 20 V supply, about 65 uA while waiting; OUT gives about 3.3 V for a set time after it sees motion; pins GND, OUT, VCC from the left with the dome facing you; a jumper for L or H mode and two trimmers, time and range)
- TIP120 Darlington transistor, TO-220 (B, C, E from the left with the printed face toward you; the metal tab is the collector; 60 V, 5 A, gain at least 1000; it has its own base-emitter resistors inside)
- Small submersible water pump, 3 to 6 V DC (about 130 to 220 mA, 80 to 120 L/h; red wire +, black wire -; it must always sit under water)
- 1N4007 diode across the pump (flyback; 1000 V, 1 A)
- Resistors, 1/4 W: one 2.2k (sensor OUT to the TIP120 base) and three 220 ohm (one for each LED)
- Three green 5 mm LEDs
- Clear heat-shrink tube and clear silicone to seal the three LEDs and their resistors into one waterproof sleeve
- 4 x AA battery holder (6 V) and four fresh alkaline AA cells
- A half breadboard (only its power rail is used) or a small piece of stripboard, and wires
- The prop: a black plastic cauldron about 30 cm (12 in) across, a clear tube with a 6 mm inside diameter pushed over the pump's outlet, an empty glass or plastic potion bottle, glue or clear silicone to fix the bottle on the tube, and a few drops of green food colouring in the water
How it is wired
- Holder red lead (+) is the +6 V line, holder black lead (-) is GND. Put them on the two lines of the breadboard's power rail: red on the + line, black on the - line. One supply, one ground for everything.
- +6 V to the sensor's VCC pin and to the pump's red wire.
- GND to the sensor's GND pin and the TIP120 emitter (right leg).
- Sensor OUT (middle pin) through the 2.2k to the TIP120 base (left leg). No resistor from base to ground is needed: the sensor's output sits at 0 V when idle, and the TIP120 has its own base-emitter resistors inside.
- The pump's black wire to the TIP120 collector (middle leg, or the metal tab, which is the same pin).
- 1N4007 across the pump: its band (cathode) on the red +6 V pump wire, the plain end (anode) on the black wire that goes to the collector.
- LEDs, three rungs between the two pump wires: red pump wire, then a 220 ohm, then the LED's long leg (anode); the LED's short leg (cathode) to the black pump wire. So the LEDs light exactly while the pump runs. Seal all three rungs and every bare joint in clear heat-shrink filled with clear silicone before it goes into the water.
- Water side: push the clear tube over the pump's outlet, run it straight up, and fix the potion bottle on its top end with the mouth tilted down, the tube end just inside the bottle's neck. Set the pump on the cauldron's floor and fill with water so the pump stays well covered.
- Sensor: mount it outside the window, on the outer sill, with its lens aimed down at the patch of sidewalk right in front of the window. Bring its three wires inside through the window frame (a flat cable fits under a closed sash). Keep the battery, the breadboard and the TIP120 dry, in a box, away from the water.
- HC-SR501 settings: jumper on L (single trigger), time trimmer turned down to about 3 s (near fully anticlockwise; some boards cannot go below 5 s, which only makes the pour longer), range trimmer at minimum (about 3 m), so people passing on the far side of the sidewalk do not set it off. Give it 30 to 60 s to settle after you put the cells in.
How it works
- At rest the sensor's OUT is at 0 V, the TIP120 is off, the pump and the LEDs are dark, and the whole circuit draws only the sensor's 65 uA.
- A face comes up to the glass. The sensor's OUT rises to about 3.3 V and pushes about 0.6 mA through its own 1k on the board and the 2.2k into the TIP120 base. With a gain of at least 1000 the transistor turns on and joins the pump's black wire to GND.
- The pump gets about 5 V (the 6 V cells minus the TIP120's drop of about 0.9 V), inside its 3 to 6 V. The three LEDs light at once, each about 14 mA through its 220 ohm (16 mA on fresh cells), under their 25 mA maximum. The TIP120 carries about 0.22 A in all, far under its 5 A, and loses about 0.2 W, so it needs no heatsink.
- The pump pushes the water up the clear tube. In the Short the tube rises about 13 cm (5 in) above the water, and at about 84 L/h the water reaches the bottle in under 0.2 s. It fills the bottle's neck, spills out of the mouth around the tube and runs back down the outside of the tube into the cauldron. From a few steps away you see only the stream, so the bottle seems to float and pour by itself.
- The water never runs out: the same water goes round. Only about 7 mL (1.5 teaspoons) is out of the cauldron at any moment, in the tube and in the falling stream, so the level hardly moves.
- After about 3 s the sensor's timer ends and OUT drops to 0 V, so the TIP120 turns off. The 1N4007 catches the pump coil's voltage kick, so the transistor never sees a spike. The pump coasts down for a moment, and while it spins it works as a small generator that keeps the LEDs lit for a few hundredths of a second, so they dim out instead of cutting off hard. The tube drains back through the pump into the cauldron.
- Then the HC-SR501 ignores motion for about 2.5 s (its fixed blocking time after the output goes low), and after that it waits for the next visitor. In L mode the pour always ends after the set time, even if the visitor is still at the glass.
- Why the sensor is outside: a PIR sees the far infrared that body heat gives off, and window glass blocks it. Behind the glass it would never see anyone (Panasonic's PIR FAQ says the same).
- Why no capacitor across the battery: the sensor board has its own regulator and capacitors, and the pump only starts or stops while the sensor is already on or in its 2.5 s pause, so the pump cannot set it off again. If a build still misbehaves, 100 uF across the + and - lines is the fix.
- Batteries: about 0.2 mAh per pour and 65 uA while waiting, so 300 visitors use about 56 mAh of a set of AA cells' roughly 2,500 mAh: one fresh set lasts the season.
- Changed from the viral originals: they pour all night from a plug. This one runs on batteries and pours only when someone looks in, so every kid gets the surprise.
What the video simplifies
- The cauldron is drawn cut open at the front so you can see the pump, the bottom of the tube and the sealed LED sleeve.
- Everything is drawn in one plane. In a real build the sensor sits outside on the sill, its wires pass through the window frame, and the battery, the breadboard and the TIP120 stay dry in a box.
- The HC-SR501 has no light of its own. The LOW / HIGH tag on its yellow output wire is drawn so you can see when it fires.
- The pump, the LEDs, the sensor and the electronics are drawn larger than the cauldron's scale and the battery holder smaller, so the parts and labels can be read. The TIP120 is drawn turned over with its legs up; it works the same either way.
- The water is dyed green and its glow is stronger than three LEDs would really make it.
- The stream falls at free-fall speed in the Short. Real water runs down the outside of the tube as a film, a little slower.
- Assumed or typical values: the pump's flow, current (0.18 A) and start, the TIP120's 0.9 V drop, the 1k on the sensor board, the 3 s timer setting, the sealed sleeve and where the sensor's view starts.
- With tired cells or a weak sensor output the drive into the TIP120 gets thin. Use fresh cells; if the pump still runs weak, a 1k in place of the 2.2k gives it more drive (still about 1 mA from OUT).
- The kids, their faces, the leaves and the headlight sweep are staged, and all the sounds are synthesised.
- This circuit was checked by calculation, an ngspice simulation and the datasheets, not built.
Everything runs on four AA cells (6 V DC); never use a mains pump or a mains adapter near the water. Seal the LEDs, the resistors and every joint that goes into the water, and keep the battery, the breadboard and the transistor dry and out of the cauldron. Never run the pump dry: keep it covered with water. Use food colouring only, and keep the water out of reach of small children and pets. Put an LED light in the pumpkin, not a real candle, next to the costumes and the window. Fix the tube and the bottle firmly so nothing can tip over, wipe up spills so nobody slips, and never short the battery leads: AA cells can get hot.
Build it yourself
The wiring board has no PIR sensor, water pump or tubing yet, so this one cannot be opened on it. Start with the guided first build on the wiring board, where a circuit really works as you wire it, then try the ready-made ones.
Your first circuit, step by stepAll circuits from the Shorts
Stuck, or built it?
Ask about this circuit or show your build in the Wirecora Discord. Questions get an answer every day.