Touchless trash can with an Arduino and an HC-SR04
Bring a hand with rubbish within 20 cm of the sensor and the lid swings up by itself. Drop the rubbish in and take your hand away: one second later the lid closes, slower than it opened.
From the Short This Trash Can Opens Before You Touch It | Arduino + HC-SR04 (posted 23 October 2026). Opens on YouTube.
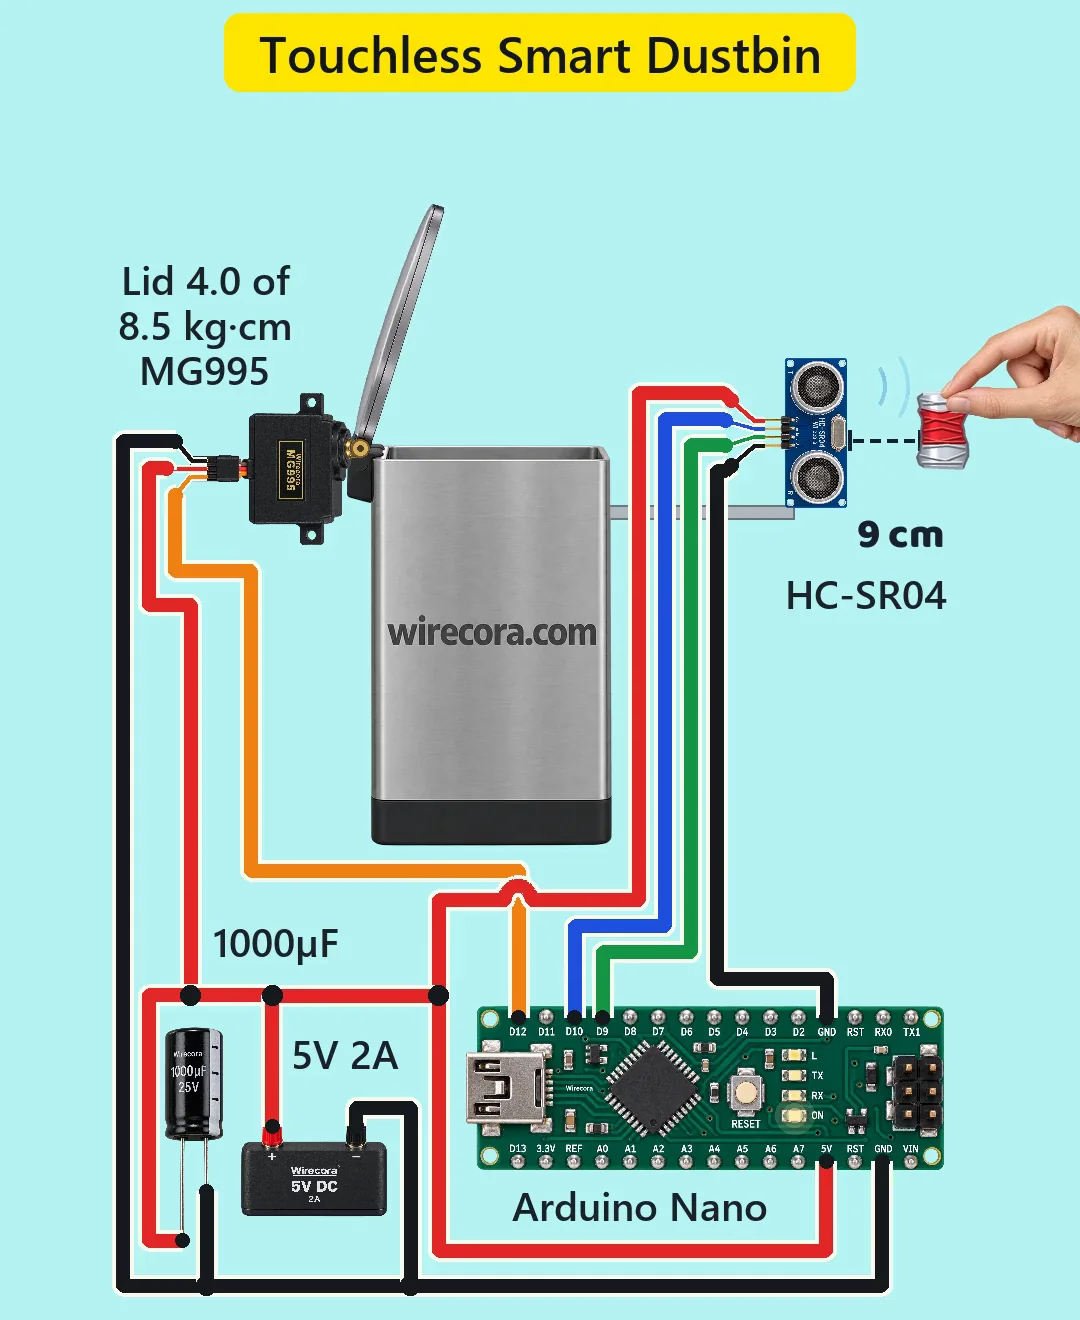
Parts
- Arduino Nano (an Uno works the same)
- HC-SR04 ultrasonic sensor, 5 V, about 15 mA, pins Vcc, Trig, Echo, Gnd
- MG995 metal-gear servo (brown GND, red VCC, orange signal; 4.8 to 7.2 V; 8.5 kg cm at 4.8 V; about 1.2 to 1.5 A when stalled). An SG90 (1.8 kg cm) is too weak for a metal lid.
- 1000 uF 25 V electrolytic capacitor (the stripe is the minus side)
- 5 V 2 A power adapter
- A bin with a hinged lid (the numbers here are for a 0.25 kg lid, 32 cm from hinge to front edge), a bracket for the servo at the hinge and one for the sensor at the front
How it is wired
- Adapter plus (5 V) to the Nano's 5V pin, the HC-SR04 Vcc, the servo's red wire and the capacitor's plus (long) leg.
- Adapter minus to a Nano GND pin, the HC-SR04 Gnd, the servo's brown wire and the capacitor's minus (stripe) leg. One common ground.
- Nano D10 to HC-SR04 Trig; HC-SR04 Echo to Nano D9.
- Nano D12 to the servo's orange (signal) wire.
- Solder the 1000 uF capacitor right at the servo plug, across its red and brown wires. It covers the servo's current bursts so the Nano does not reset.
- Mount the sensor at the front of the bin, looking out at where a hand comes, and clear of the lid when it opens.
How it works
- About every 20 to 33 ms (30 to 50 times a second) the Nano sends a 10 microsecond pulse to Trig and times the echo on Echo. Echo time in microseconds divided by 58 is the distance in cm. It stops listening after 12 ms, about 2 m.
- The datasheet asks for at least 60 ms between pings, so that a late echo of one ping is not read as the next. This sketch pings faster so the lid moves smoothly. If the lid sometimes opens with nobody near, that is a late echo: ping only on every third pass of the loop.
- A reading between 2 and 20 cm notes the time. For one second after the last near reading the target is open (servo at 110); after that it is closed (servo at 10).
- The servo does not jump: each loop it moves a quarter of the way that is left, at most 5 degrees per loop while opening and 4 while closing. The loop takes longer when nothing echoes, so the lid closes at about half the opening speed: a soft close.
- At power-up the lid stays shut until the sensor has seen something near once.
- Lifting the lid takes 0.25 kg x 16 cm = 4.0 kg cm at the start; the MG995 gives 8.5 kg cm at 4.8 V, about twice what is needed.
- Worst case the adapter gives 1.5 A to a stalled servo plus about 35 mA for the Nano and the sensor: 1.53 A of its 2 A.
- The Servo library takes over the timer behind D9 and D10, which only switches off PWM there; as plain Trig and Echo pins they work normally.
The code: touchless_bin.ino
The Arduino code for this circuit is in the Wirecora Discord, in the channel #arduino-code (owner’s choice, 14 October 2026: the code lives where you can ask about it). It is a plain .ino file you can download there.
The sketch the Short was animated from, run step by step in a simulation on the distances drawn in the video; it has not been run on a real board yet. It uses the built-in Servo library. Fit the horn with the servo at 10 and the lid shut, then change CLOSED and OPEN until the lid shuts and opens fully.
What the video simplifies
- The ping arcs and the dashed distance line are drawn to show what the sensor measures; ultrasound is invisible and silent.
- The electronics are drawn several times larger than the bin so the pins and labels can be read.
- The sensor is drawn face-on, turned on its side, so its pins can be read. In a build it looks forward at the hand. Its 15 degree beam is not drawn.
- The servo is drawn side-on with its shaft on the hinge. In a build it sits on a bracket behind the hinge.
- The capacitor is drawn next to the supply. It is on the same two wires, but solder it at the servo plug.
- The hand stops 9 cm from the sensor and tosses the item in, so the clip fits in a few seconds. The lid holds open for 1 s; bought bins wait about 3 s, so change 1000 to 3000 in the sketch.
- The 0.25 kg lid and the 1.5 A stall current are typical values, not measured.
- The can and the paper ball are drawn, and the sounds are synthesised.
- This circuit was checked by simulation and against the datasheets, not built.
Everything runs on 5 V from the adapter, never a battery on the 5V pin. An MG995 is strong enough to pinch a finger: keep fingers out of the hinge, and do not hold the lid down while it tries to open, because a stalled servo draws about 1.5 A and gets hot. Keep the electronics in a box away from wet rubbish.
Build it yourself
The wiring board cannot run an Arduino program yet, so this one cannot be opened on it. Start with the guided first build on the wiring board, where a circuit really works as you wire it, then try the ready-made ones.
Your first circuit, step by stepAll circuits from the Shorts
Stuck, or built it?
Ask about this circuit or show your build in the Wirecora Discord. Questions get an answer every day.