Sun-sensing patio umbrella with an Arduino, an LDR and a servo
A cloud slides off the sun: the light sensor on top of the pole sees it, the yellow SUN LED lights and a servo pushes the umbrella's runner up the pole, so the canopy opens and shades the chair. When a cloud covers the sun and the sky stays dark, the umbrella folds again, slower than it opened.
From the Short This Patio Umbrella Opens Itself When the Sun Comes Out (posted 19 October 2026). Opens on YouTube.
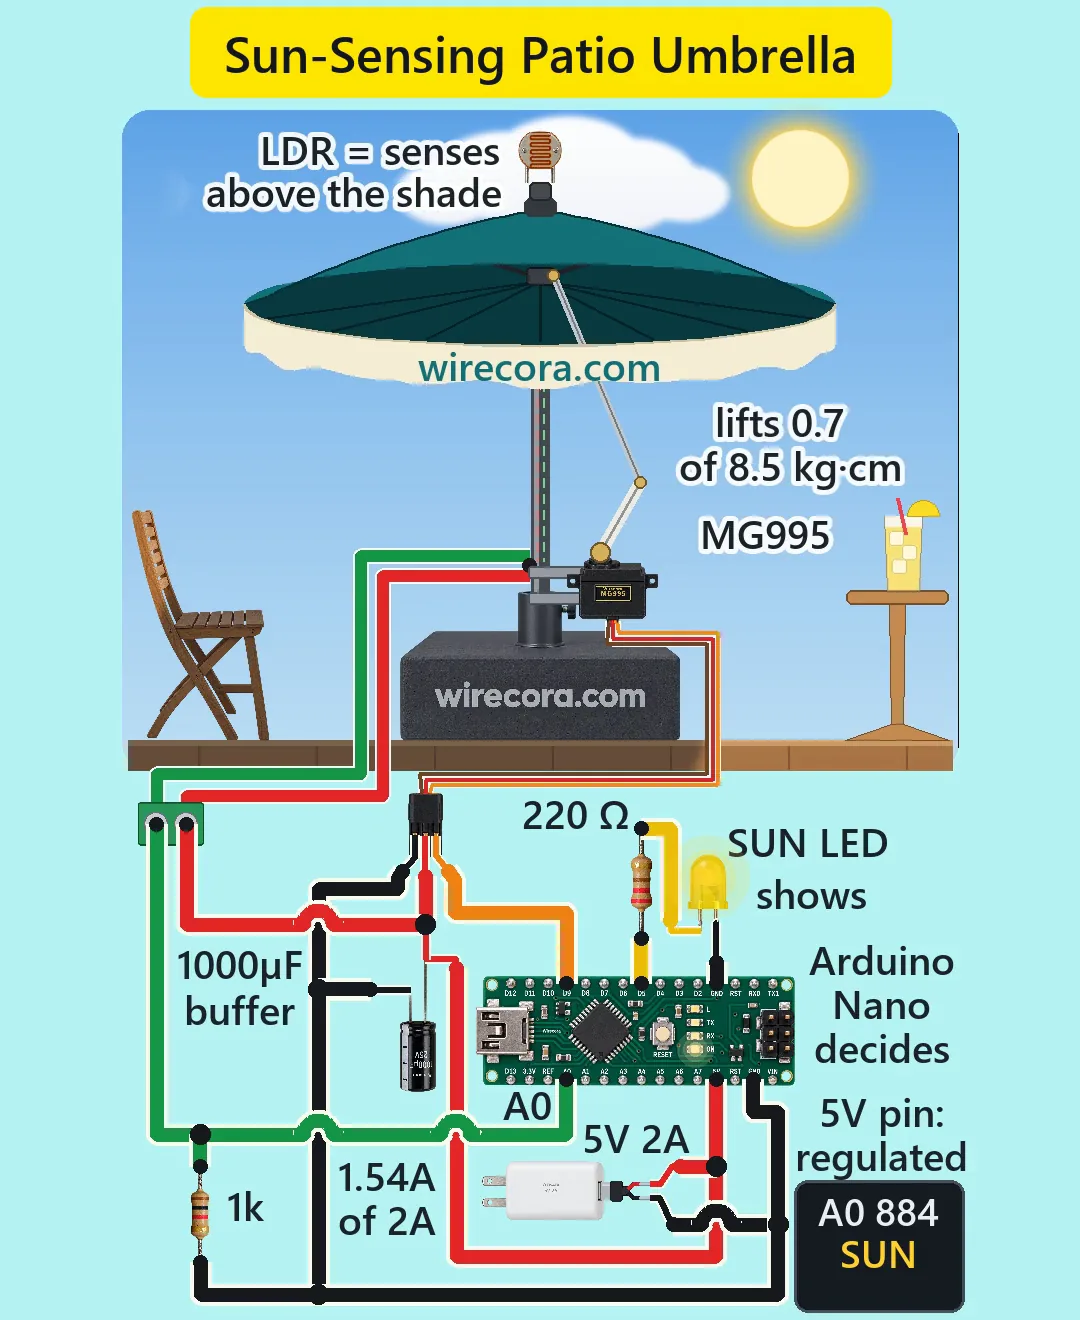
Parts
- Arduino Nano (an Uno works the same)
- GL5528 LDR (light-dependent resistor), two legs, either way round
- 1k resistor, 1/4 W, for the LDR divider (bands brown, black, red, gold)
- MG995 metal-gear servo (brown GND, red VCC, orange signal; 8.5 kg cm at 4.8 V; about 1.5 A when stalled)
- 1000 uF 25 V electrolytic capacitor (the stripe is the minus side)
- Yellow 5 mm LED and a 220 ohm resistor (bands red, red, brown, gold)
- 5 V 2 A USB adapter with a cut USB cable (red = +5 V, black = ground), or any regulated 5 V 2 A supply
- A two-way screw terminal for the LDR wires
- A model umbrella (about 40 cm) with a sliding runner, a servo arm extension of about 5.5 cm and a stiff push-rod from the arm to the runner
How it is wired
- Supply plus (5 V) to the Nano's 5V pin, the servo's red wire, the capacitor's plus (long) leg and one leg of the LDR.
- Supply minus to a Nano GND pin, the servo's brown wire, the capacitor's minus (stripe) leg and one end of the 1k. One common ground.
- The LDR's other leg to Nano A0 and to the other end of the 1k.
- Nano D9 to the servo's orange (signal) wire.
- Nano D5 to the 220 ohm; the other end to the yellow LED's anode (long leg); the LED's cathode (short leg) to a Nano GND pin.
- Put the 1000 uF capacitor right at the servo plug, across its red and brown wires.
- Mount the LDR on top of the pole, above the canopy, facing the sky; run its two wires down the pole to the screw terminal.
- Fix the servo to the pole and join its arm to the runner with the push-rod. Nano VIN stays free.
How it works
- The LDR and the 1k form a divider: the more light, the lower the LDR's resistance and the higher the voltage on A0. The Nano reads it as a number from 0 to 1023: 1023 x 1000 / (1000 + R).
- In bright sun (about 20,000 lux assumed) the LDR is about 157 ohm and A0 reads about 884; under a cloud (about 4,000 lux) it is about 412 ohm and A0 reads about 724. In daylight an LDR is only a few hundred ohm, so the divider uses 1k: with 10k, sun and cloud would read almost the same.
- Two thresholds stop it flapping: it counts as sunny above 820 and only counts as dark again at 780 or below. On top of that it opens only after 1 minute of steady sun and folds only after 5 minutes of steady shade; every change of sun or shade restarts the wait, so a short cloud does nothing.
- The SUN LED on D5 shows what the sketch thinks right now: (5 - 1.95) / 220 = 13.9 mA, under the 20 mA a Nano pin should give.
- The servo arm goes from 150 degrees (folded) to 30 (open). Each 20 ms loop it moves a quarter of the way that is left, at most 5 degrees while opening and 3 while folding, so it slows down as it arrives (eases out) and folds at about 3/5 of the opening speed (about 150 against 250 degrees a second, both under the MG995's 300).
- The arm pushes the rod, the rod pushes the runner up the pole, and the runner's stretchers spread the ribs. On the drawn linkage that needs about 0.7 kg cm, against the MG995's 8.5.
- Why the LDR sits on top: under the canopy the umbrella's own shade would read as cloud, so it would fold, see sun, open, and so on for ever.
- Worst case, a stalled servo takes about 1.5 A plus about 40 mA for the rest: 1.54 A of the adapter's 2 A. The 1000 uF covers the servo's start-up current bursts so the Nano's 5 V does not dip and reset it. The servo has its own motor driver inside, so no flyback diode is needed.
- Regulated 5 V goes straight into the 5V pin, which skips the Nano's regulator; VIN would need 7 to 12 V.
The code: sun_umbrella.ino
The Arduino code for this circuit is in the Wirecora Discord, in the channel #arduino-code (owner’s choice, 14 October 2026: the code lives where you can ask about it). It is a plain .ino file you can download there.
The sketch the Short was animated from, run step by step in a simulation on the light levels drawn in the video (with the waits shortened for the clip); it has not been run on a real board yet. It uses the built-in Servo library. Fit the arm with the servo at 150 and the umbrella folded, then change FOLDED and OPEN until it folds and opens fully, and set SUN_ON and SUN_OFF from your own A0 readings.
What the video simplifies
- It is a 40 cm model. A full-size patio umbrella needs a winch or a linear actuator and a wind sensor, not a hobby servo.
- The waits are sped up: 1 minute and 5 minutes run as a fraction of a second, and the clouds move much faster than real ones.
- The light levels (20,000 lux in sun, 4,000 under a cloud) and the LDR's resistance there are assumed from its datasheet. Real sun is brighter and LDRs vary, so take the two thresholds from your own readings: print analogRead(A0) to the Serial Monitor in sun and under a cloud.
- The A0 readout on screen shows what the Serial Monitor would print; the sketch itself does not print.
- The LDR is drawn face-on so its track shows; in a build it faces the sky.
- The push-rod is drawn behind the folded canopy; in a build it passes between two ribs through a slot in the fabric.
- The canopy weight is assumed, the electronics are drawn much larger than the model and the adapter is drawn small.
- The deck and chair darken under cloud to show the overcast light.
- The viral original faked the sun with a torch; this one uses the real sky, puts the LDR above the canopy, uses a 1k divider and adds the 1000 uF and the waits.
- The sounds are synthesised.
- This circuit was checked by simulation and against the datasheets, not built.
Everything runs on 5 V from a regulated adapter, never a battery or anything above 5.5 V on the 5V pin, and unplug it before you plug in USB to upload. If you cut a USB cable, check with a meter which wire is +5 V before connecting. An MG995 can pinch a finger, so keep hands out of the arm and the runner. Outdoors, keep the adapter and the Nano in a weatherproof box. In the EU, cadmium (CdS) LDRs like the GL5528 are restricted: a phototransistor or a BH1750 light sensor does the same job with other thresholds.
Build it yourself
The wiring board cannot run an Arduino program yet, so this one cannot be opened on it. Start with the guided first build on the wiring board, where a circuit really works as you wire it, then try the ready-made ones.
Your first circuit, step by stepAll circuits from the Shorts
Stuck, or built it?
Ask about this circuit or show your build in the Wirecora Discord. Questions get an answer every day.