Motion sensing window: Arduino Nano, PIR sensor and an SG90
Wave a hand past the PIR sensor and the model window slides open. The PIR sensor sees the warm hand and its output goes high, the Arduino Nano sees that on D2 and turns an SG90 servo from 30 to 150 degrees, and a crank and rod push the sash open. About 3 seconds after the sensor's output falls the servo turns back and the window closes again.
- 6 parts
- 5 wiring steps
- Arduino code
- 5 V supply
Quick answer
The short version. Every pin is in the full wiring below.What you need
- Arduino Nano
- HC-SR501 PIR motion sensor module
- SG90 micro servo
- 5 V 2 A DC power supply
- A light model window with a sash
- Jumper wires
How to wire it
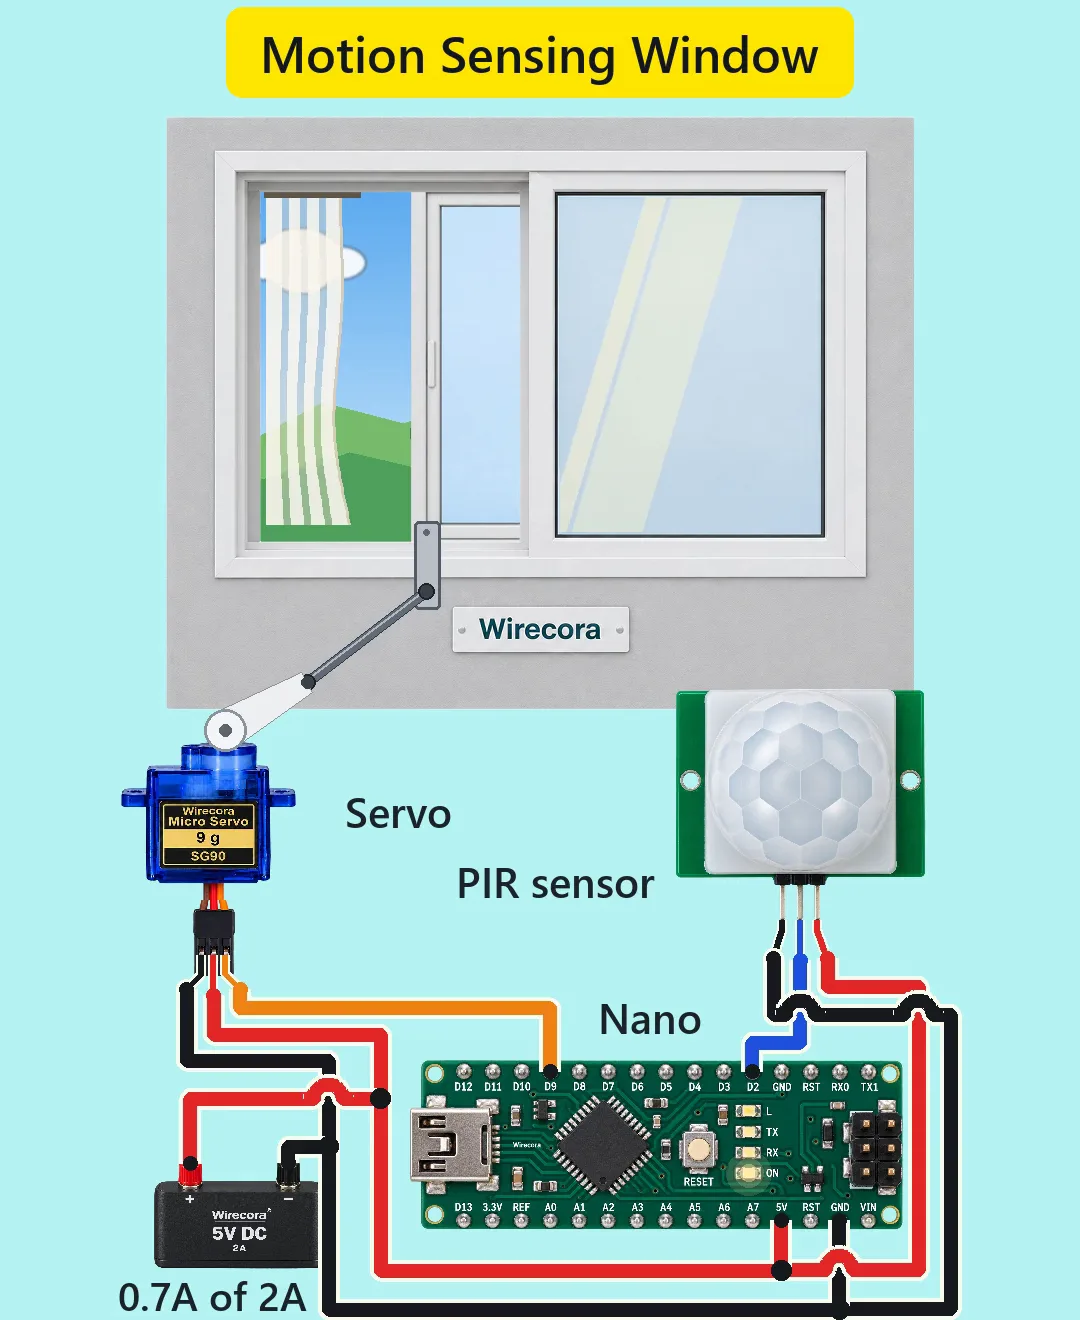
- Supply + to the Nano 5V pin, the PIR VCC pin and the servo red lead.
- Supply minus to the Nano GND pin, the PIR GND pin and the servo brown lead.
- PIR OUT to Nano D2.
- Servo orange lead (signal) to Nano D9.
- Servo horn to the sash with a crank and a rod, so that 30 degrees is closed and 150 degrees is open.
Before you power it: Everything runs on 5 V from a regulated supply. Keep fingers out of the crank and the sash while it moves, and do not plug in USB while the supply feeds the 5V pin.
Parts list
- Arduino Nano (5 V)
- HC-SR501 PIR motion sensor module (pins GND, OUT, VCC)
- SG90 micro servo (4.8 to 6 V, brown = GND, red = +, orange = signal)
- 5 V 2 A DC power supply
- A light model window with a sash, a servo horn, a crank rod and a bracket joining the rod to the sash
- Jumper wires
Wiring, step by step
- Supply + to the Nano 5V pin, the PIR VCC pin and the servo red lead. VIN and the USB socket stay empty.
- Supply minus to the Nano GND pin, the PIR GND pin and the servo brown lead. All grounds are joined.
- PIR OUT to Nano D2. The PIR output is push-pull, so D2 needs no pull-up resistor.
- Servo orange lead (signal) to Nano D9.
- Servo horn to the sash with a crank and a rod, so that 30 degrees is closed and 150 degrees is open.
How it works
- With nobody in front of the sensor the PIR output is low. D2 reads LOW, so the sketch's target is 30 degrees and the window stays shut.
- A warm hand passing the PIR lens makes its output go high, about 3.3 V. The Nano counts anything above about 3.0 V as HIGH on a 5 V supply, so D2 reads HIGH and the target becomes 150 degrees.
- Every 15 ms the sketch moves the servo 3 degrees toward the target. That is 200 degrees per second, so the swing from 30 to 150 degrees takes 0.6 s, well inside what an SG90 can do (about 600 degrees per second).
- The crank and rod turn the horn's swing into a push on the sash, and the window opens. A crank needs no end switches, because the horn simply stops at 150 degrees.
- The PIR holds its output high for a set time after it sees motion (about 3 s here, with the delay trimmer near its minimum). When the output falls, D2 reads LOW, the target goes back to 30 and the window closes.
The code: motion_window.ino
The Arduino code for this circuit is in the Wirecora Discord, in the channel #arduino-code (owner’s choice, 14 October 2026: the code lives where you can ask about it). It is a plain .ino file you can download there.
The sketch the Short was animated from. It uses the standard Servo library and has not been run on a real board. The servo steps 3 degrees every 15 ms; if the window opens the wrong way for your linkage, swap the 30 and 150.
What the video simplifies
- This is a light model sash. An SG90 is far too weak to move a real window.
- The PIR delay is set to its shortest, about 3 seconds, with the jumper in single-trigger mode (L). A real HC-SR501 also needs about a minute after power-on before it works.
- A PIR sees warm bodies such as hands, people and pets. A waved card or a moving curtain does not trigger it.
- The window is drawn larger than a model sash the servo could move, and the servo is drawn from the side with its horn turning in the picture plane. The view outside, the curtain and the sun glint are decoration.
- The linkage bracket is drawn on the front of the frame; on a real window the sash would ride in a track.
- The 0.7 A of 2 A label is the worst case with the servo stalled. A servo that is just moving draws less.
- A 100 to 470 uF capacitor across the 5 V rail near the servo is advisable on a real build, because servo current spikes can trigger the PIR by mistake. It is not drawn in the Short.
- The Nano is powered through its 5V pin, so do not plug in USB while the supply is connected. Upload the sketch first.
- The original used an Arduino Uno, a rack and a continuous servo. This one uses a Nano and a standard servo with a crank and rod, so no end switches are needed.
- This circuit was checked by simulation and against the datasheets, not built.
You found this by searching. Here's the whole path.
- Read how it works
- See it work
- Try it on the board
- Build it
- Show it
Thirty seconds of video shows the circuit doing its job. Then this whole circuit is on the wiring board. Wire it there first and watch it work before you touch a real part.
Everything runs on 5 V from a regulated supply. Keep fingers out of the crank and the sash while it moves, and do not plug in USB while the supply feeds the 5V pin.
Built it, or stuck halfway? Post a photo in the Wirecora Discord. Questions get an answer every day.
What to build next
 Same Arduino + servoYard skeleton head that turns to look at you, with two PIR sensors, an Arduino Nano and two servosA trick-or-treater walks up on one side of the path and the giant skeleton's skull turns to look straight at them, the jaw clacks three times and the eyes glow red.
 Next step: adds a buzzerSecret knock door lockKnock the secret rhythm on the door and the deadbolt turns for you.
 Something new: an IR sensorSmart parking system with two LEDsDrive the toy car into the bay and the red FULL LED lights while the green FREE LED goes dark.